Twelve Significant Photos
Now this is always a difficult one and I’ve spent a good while trying to work out which images represent something about me rather than just about the things I have found or the light that I saw them in. This is a little strange as they aren’t always necessarily my ‘best’ photographs but I’ll add a little text to each one to try to explain why I’ve chosen it.
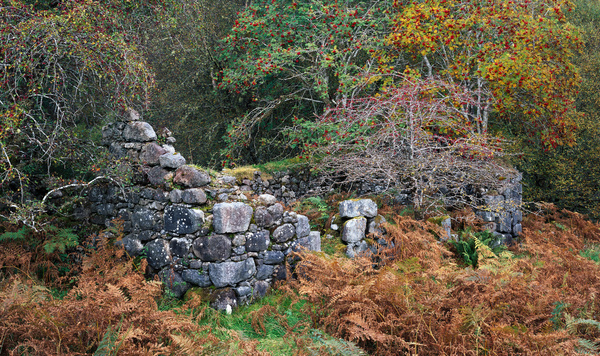
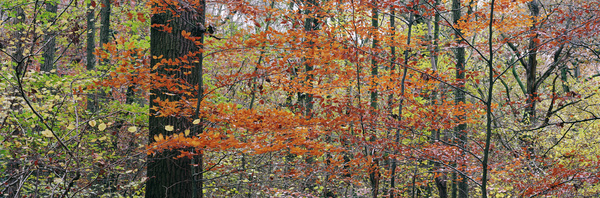
Ripening
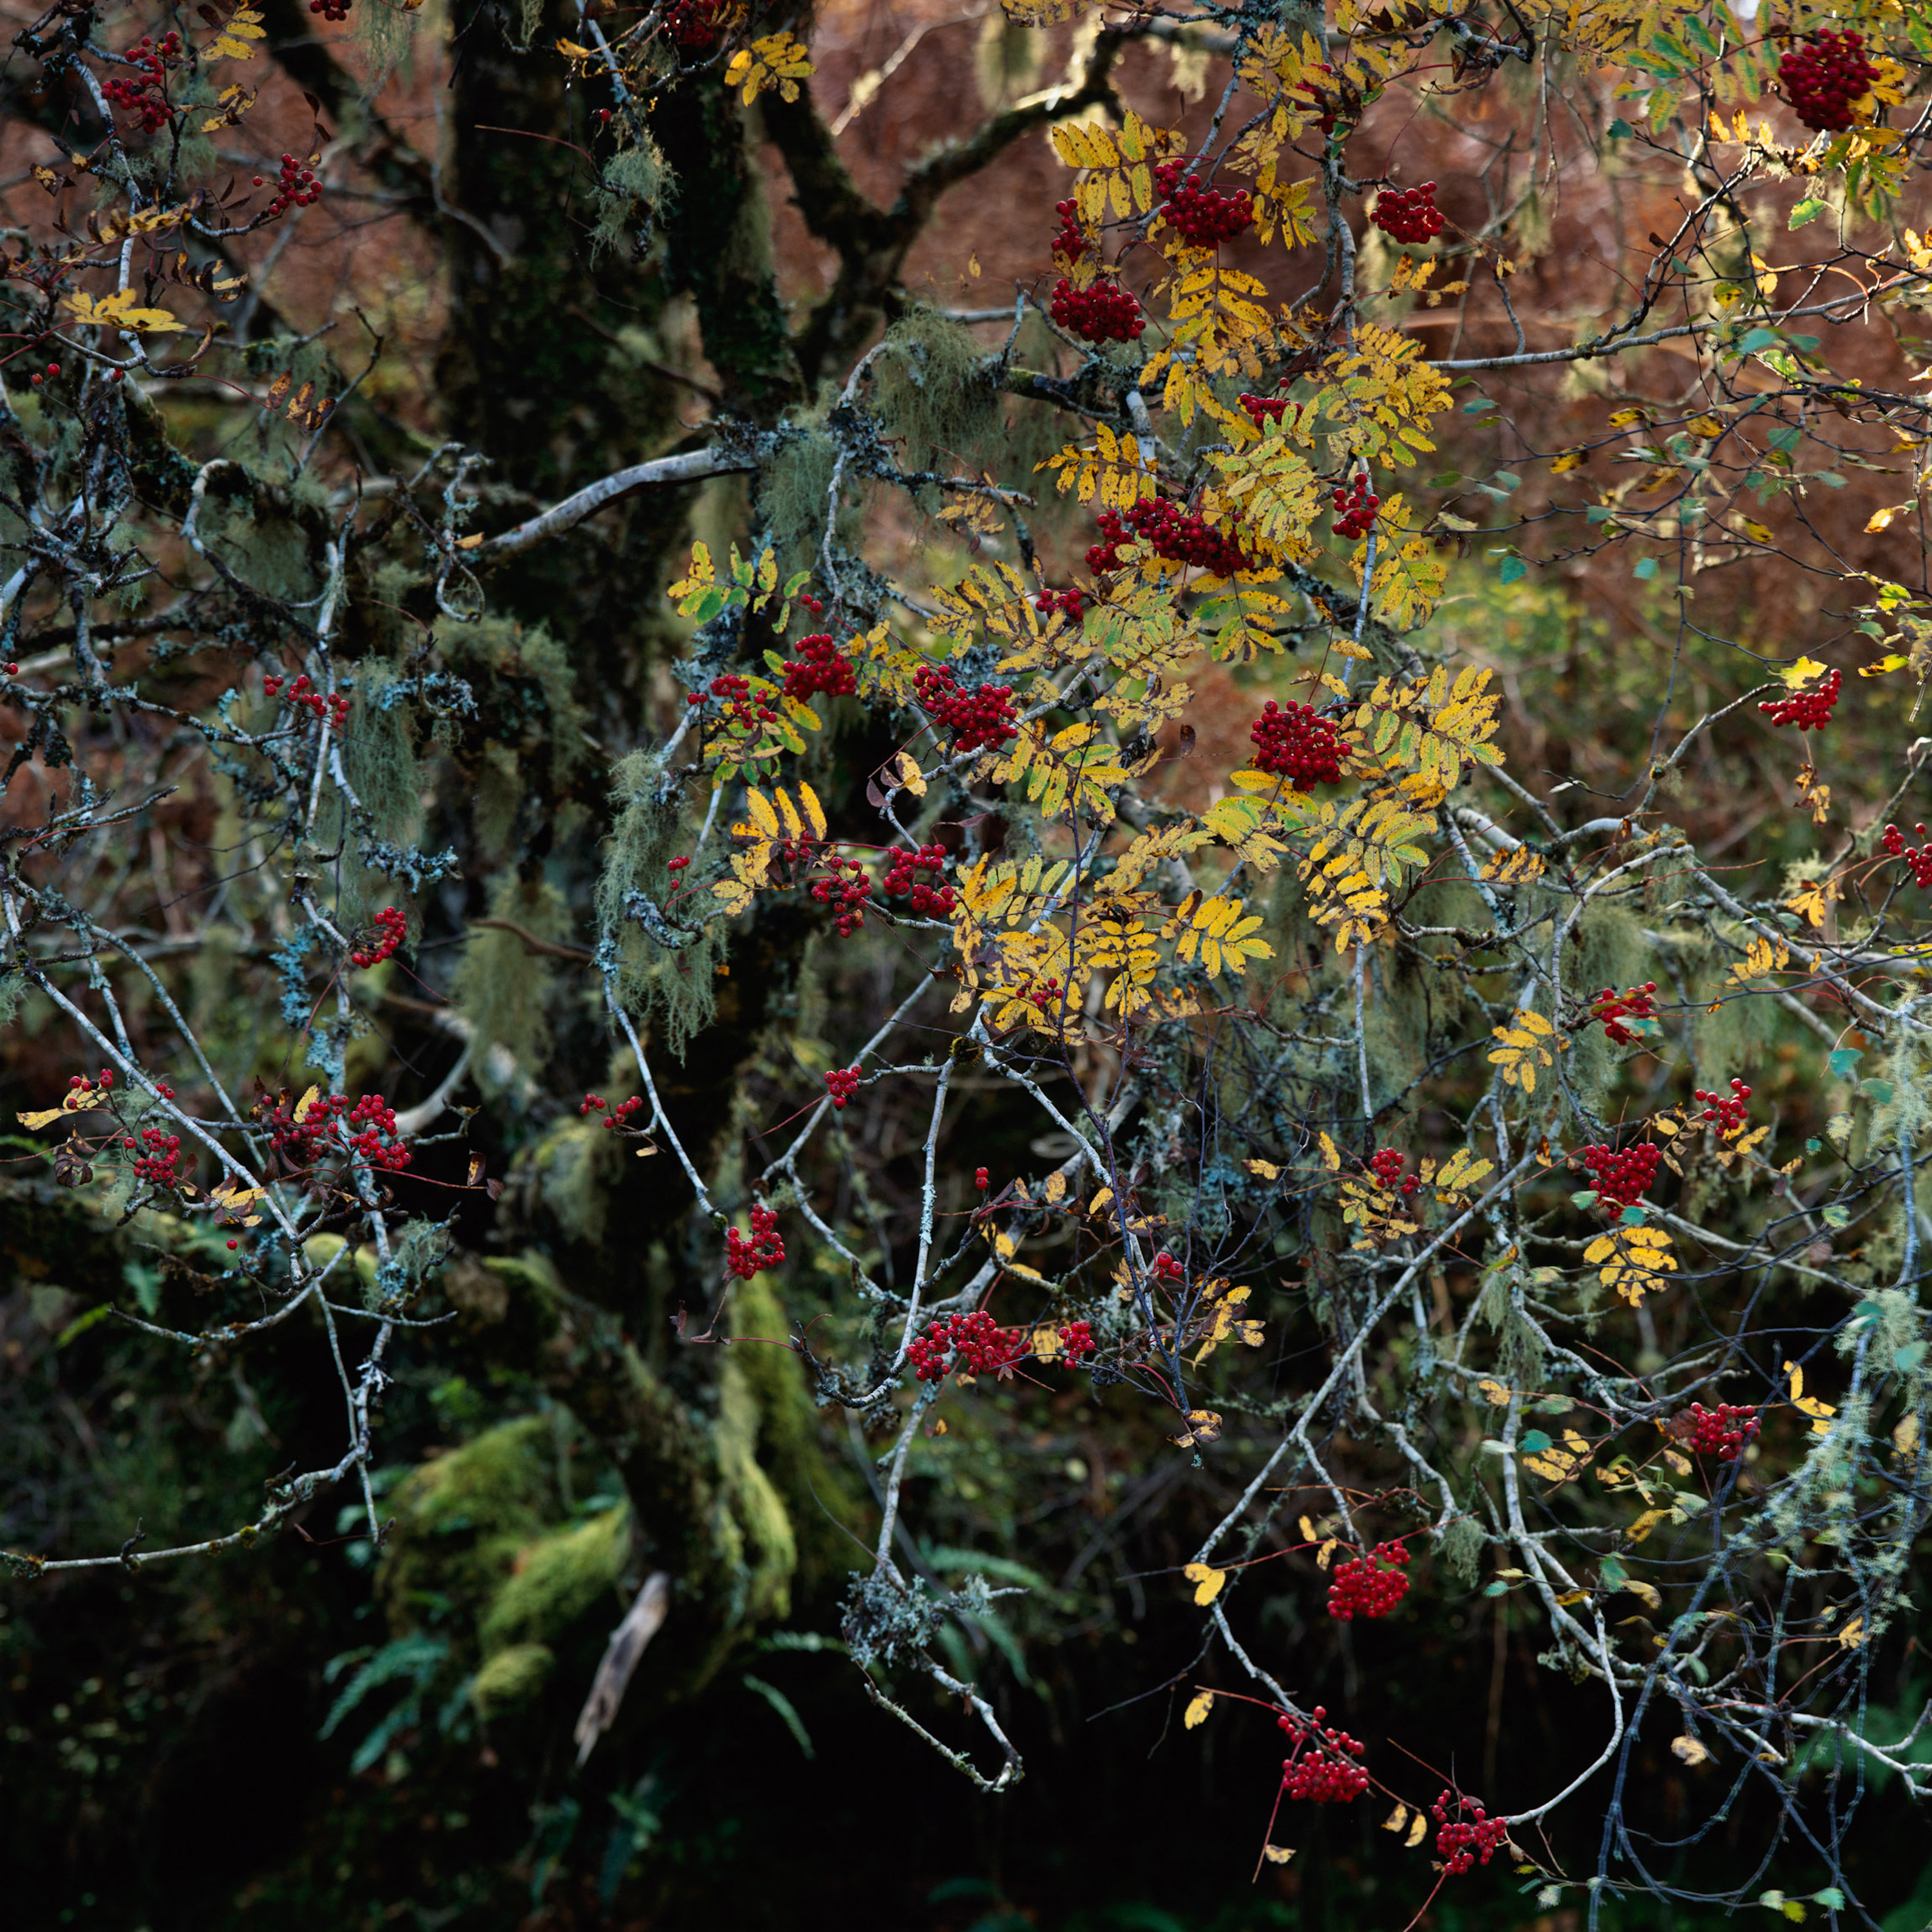
Although I got a few good images before October of this year, it was after a couple of days out in Scotland that I really got into the swing of things. This combined with some beautiful subject matter gave me the opportunity to be a little more experimental with compositions. This first composition relied on a few features. Firstly the combination of beautiful yellow leaves and abundant red berries. However, like many opportunities that arise when we’re out on location, just one tick in the box isn’t enough. The second featured was the amazing green lichen that was growing on the bare twiggy branches which combined with the bare branches picking up the blue of the sky provided a wonderful colour contrast. The third feature was that they were all in exactly the same plane, which allowed a very thin depth of field and allowed me to drop the background out of focus. The background is the final feature – a great transition from the dark bottom shaded area through the tree trunk and onto the sunlit bracken at the top.
So we’ve got a bunch of ingredients that add up to ‘potential’ – the creative part is now putting these together into a balanced and ‘pleasing’ composition. The blue/green shadow/lichen looked to me like some form of calligraphy so I used it to ‘write’ across the frame and placed the yellow/red leaves/berries in the top right to balance the tree roots in the bottom left. Most of the ‘tweaking’ was about how much of the sun highlights to include/exclude and to make sure the tree root structure in the bottom left had enough clearance around it.
Oh, and the square crop is intentional – I use a plastic mask on my ground glass to compose with. Makes a big difference in fine tuning compositions.
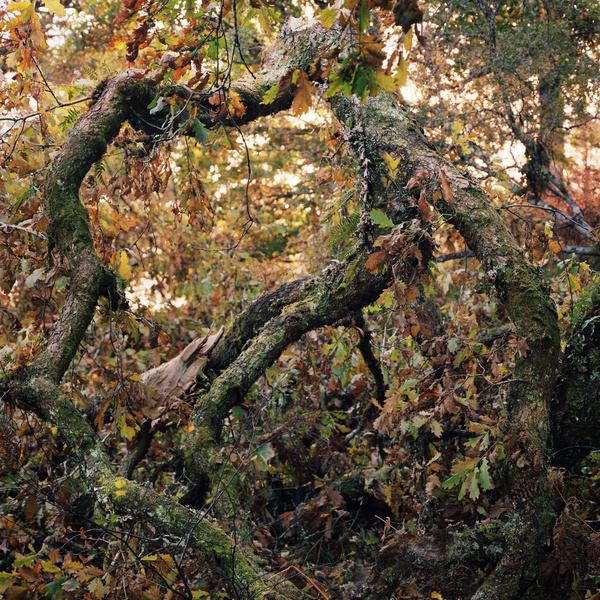
Arches
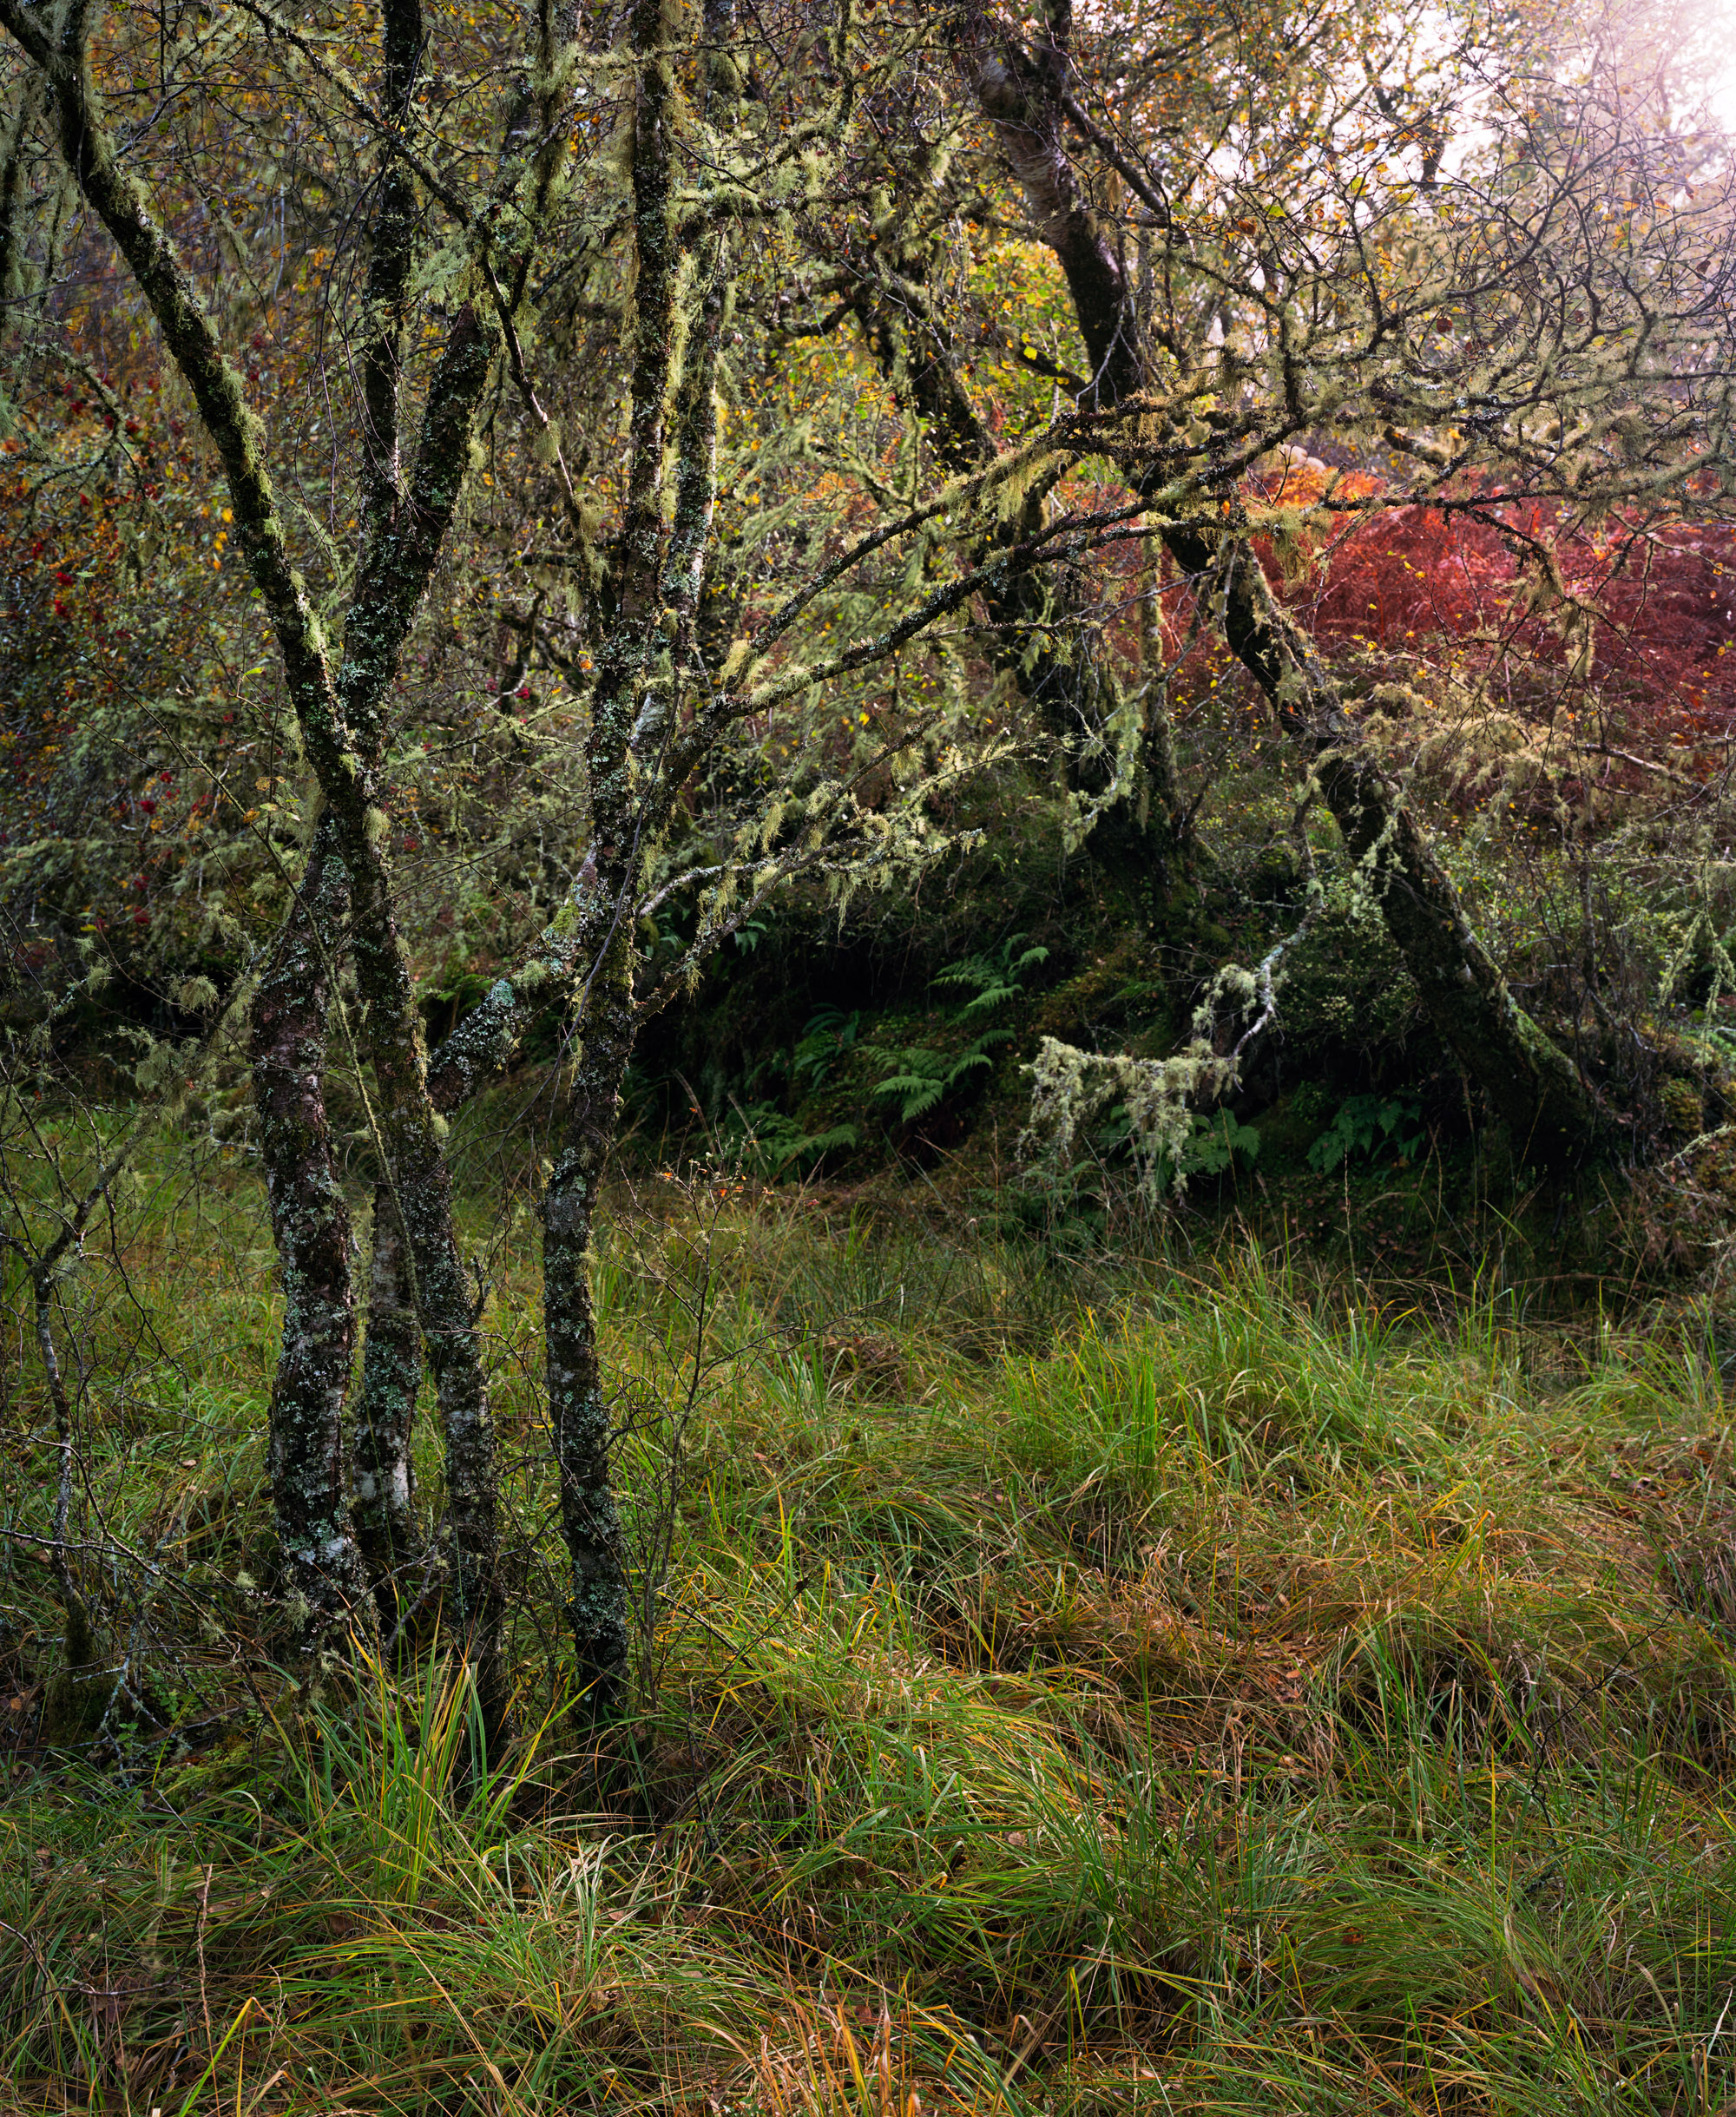
A glimpse of light showed me the potential here. However the sun only came out very occasionally so I was sitting waiting to try to figure out what it might reveal. Otherwise I would (and did) end up finding a composition that used diffuse/shaded light only to set up and for the sun to come out, and vice versa. In the end I figured the directional light was showing me more interesting views and once I saw something of interest I set up and waited for it to reoccur. In this case the light brought out some of the highlights on the reaching branch which itself was connected to a quite beautiful set of trunks.
Once I’d noticed this a glance around showed a that the supporting cast worked well, the grass was vibrant and held interesting texture, bright ferns sat in dark hollows, the red bracken provided a contrast to the greens of the grass and branches and finally I could position the trunks against a relatively featureless area of the background. On top of this the two larger trunks on the right leaned in a complementary fashion toward the main trunks.
Of course these thoughts weren’t as verbose as this and some of them occured as I sat behind the ground glass. The last step was to wait for the light to pick out the details again. this time I wanted just a subtle directional light to create a glow around the leaves (at least that was what I wanted at the time, I’m wondering if some stronger light may have helped now..)
Hanging Mosses
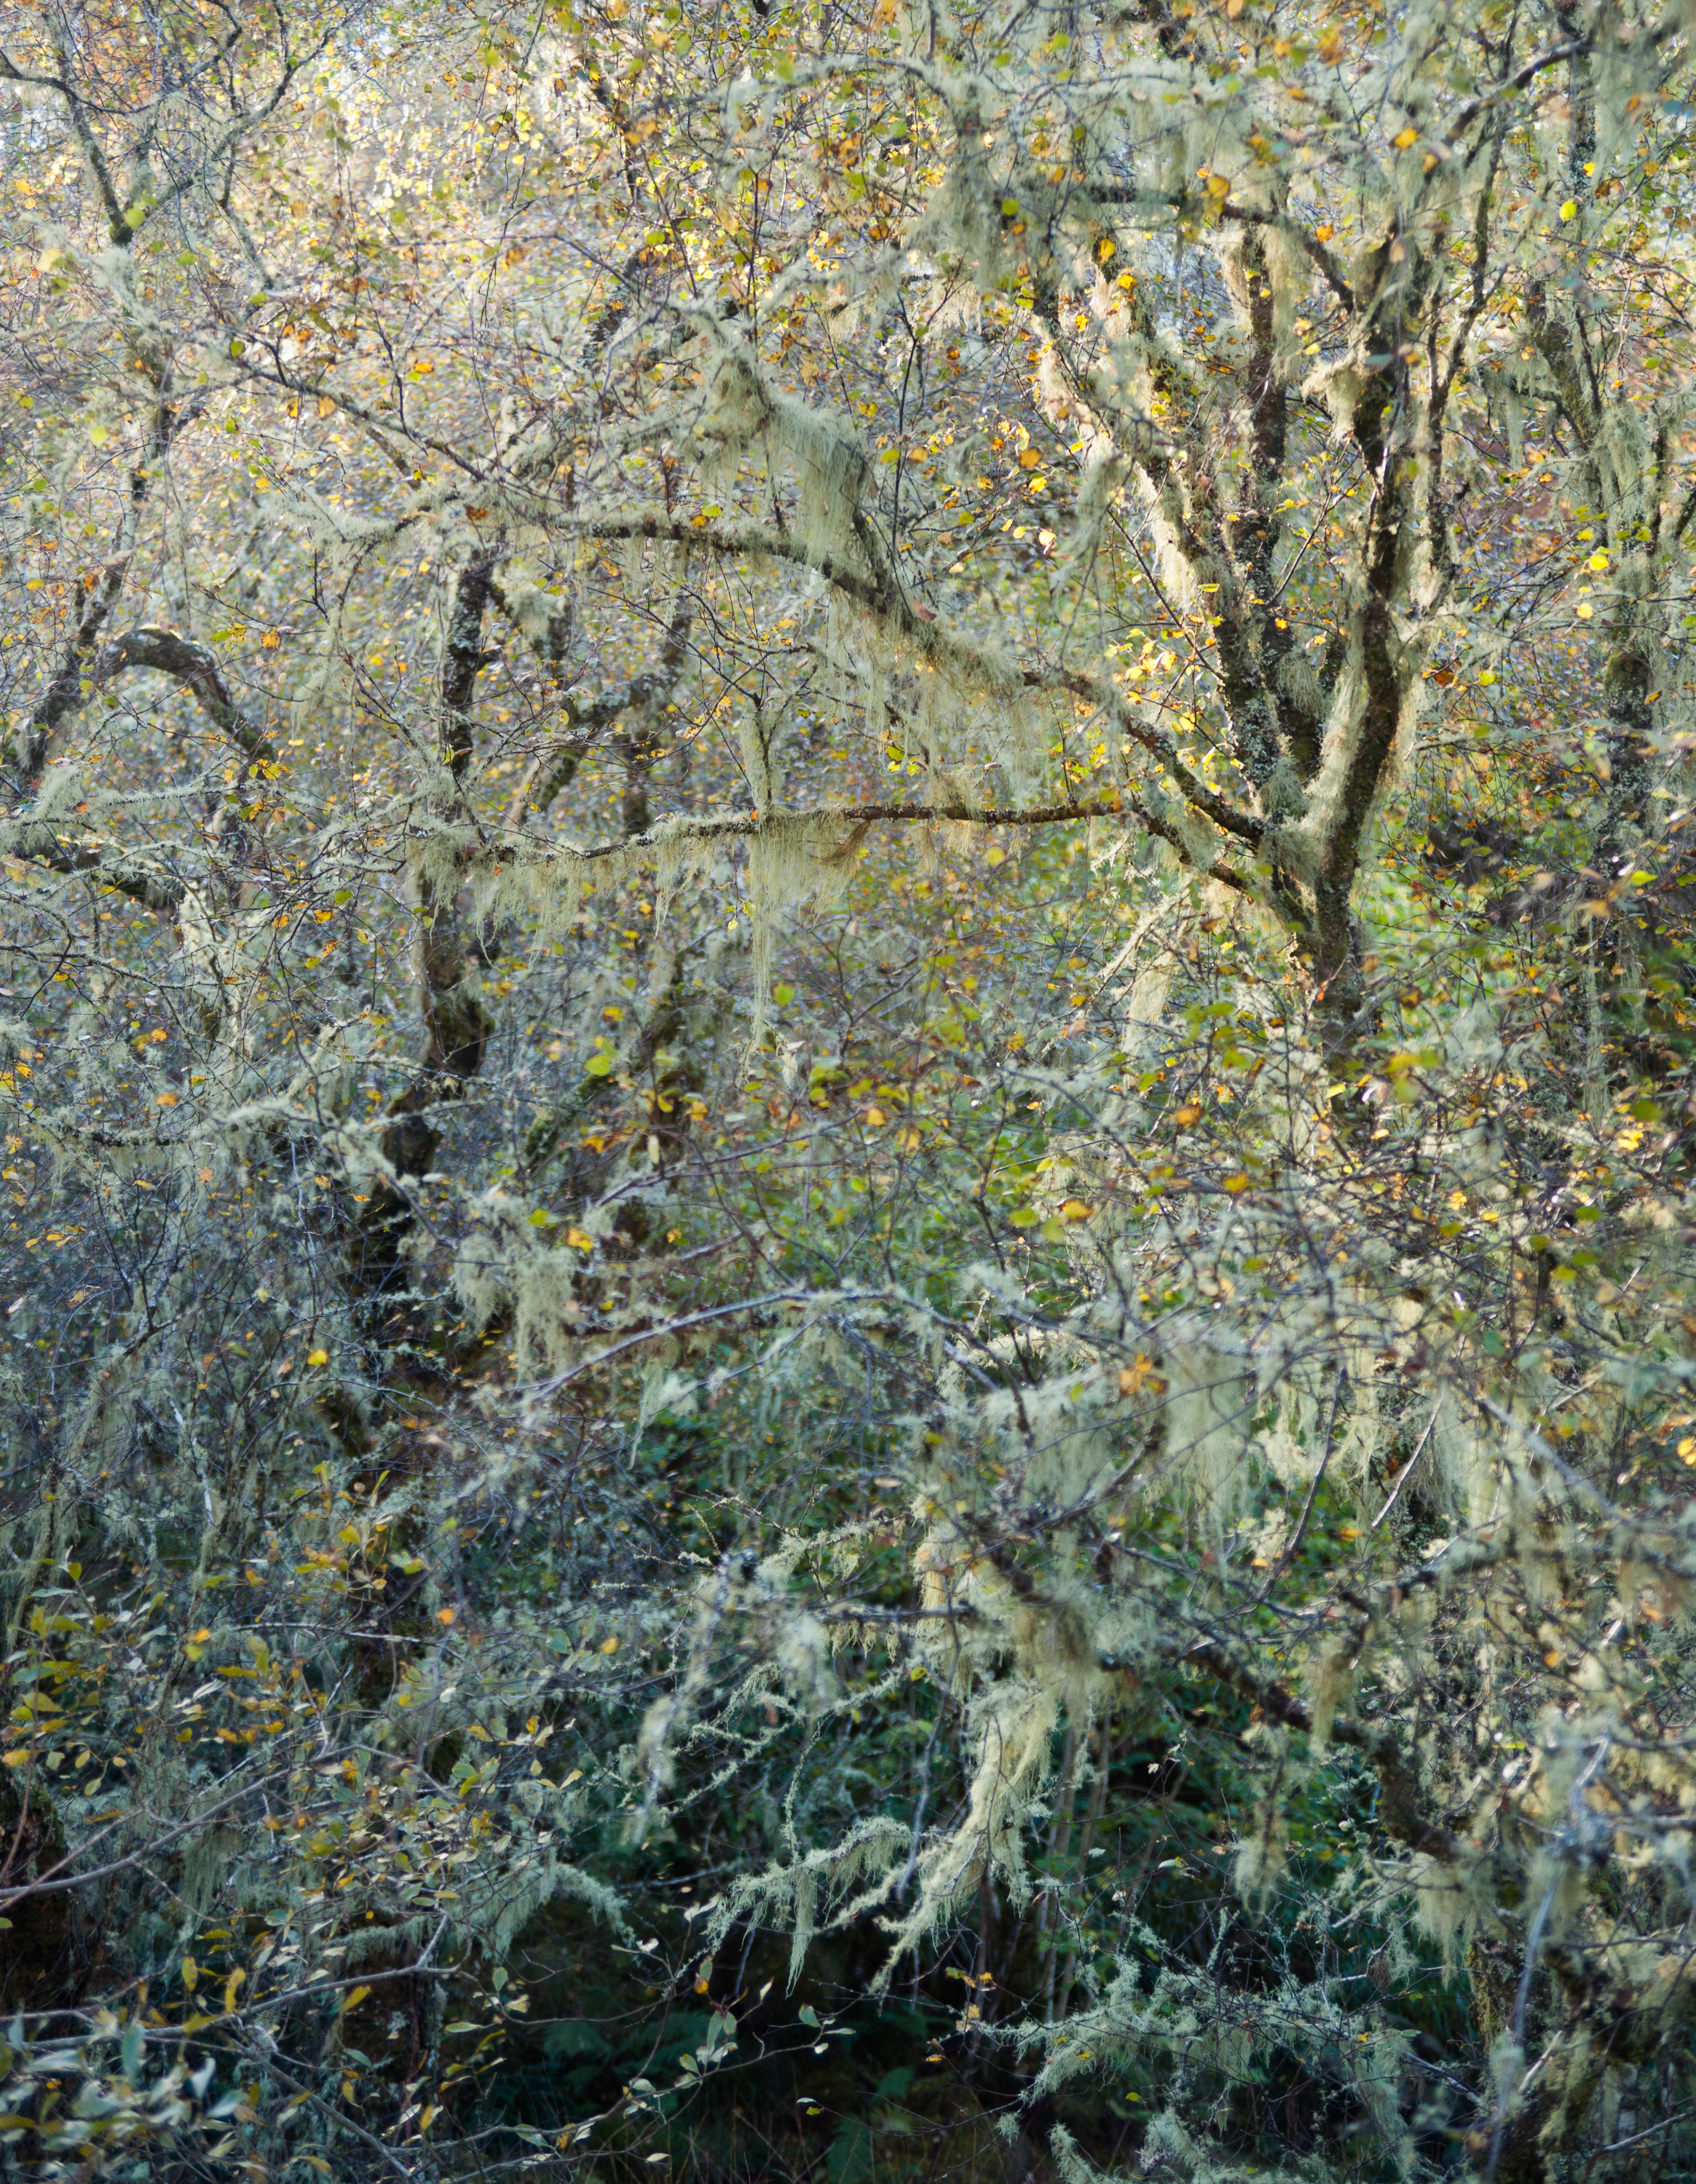
You might get the idea that I’ve had a bit of a thing about lichen this year but in fact these three pictures were all taken within about two hours of each other. They’re just off a small section of woodland called An Cnap near Salem, Ardnamurchan is just wonderful. I’m sure there are more places that have such a proliferation of licens but it’s the way the birches grow in a contorted fashion and a bank of trees on the edge that provide a background of dark areas or a woven screen against the sun. This last picture was caught hand held on my Sony A900. I was using it as a scouting camera but I’ve begun to realise just what wonderful colours it gets and also what a wonderful rendering the Minolta 28-135mm lens has, especially wider open. The spherical abberations give a subtle glow to the scene that in this case worked incredibly well. The winner here is not just the hanging lichens but the colours graduations through the picture combined with the scattered, yellow birch leaves. The composition was just an instinctive taken on those two central branches/trunks whilst ensuring the edges worked and captured the gradation from dark bottom to beam of light at the top. I shall be using the A900 in anger more often after seeing these results and comparing some of my digital and velvia captures (suffice it to say that the a900 isn’t quite the same but it’s very close and the differences are complementary ones).
Contrast
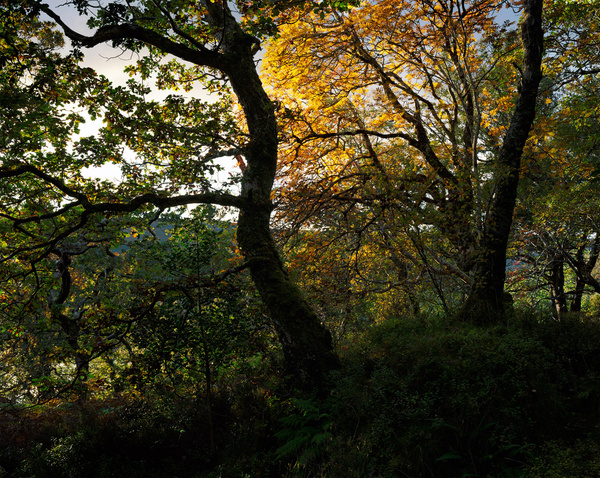
One of my favourite UK photographers is Tristan Campbell. His work was an inspiration when I started and he has consistently created photographs with a beautiful look. Recently his work has played with the use of strong contrasts and backlighting, making the most of colour neg’s incredible ability to deal with the gremlins nemesis. I’ve played with this myself but not in any serious way so far but this year I’ve tried to push things a little harder, trying to capture the backlighting and high contrast. This particular view was the sunset on the copse at the top of An Cnap. Thick clouds were stripping off the hills behind us creating the dark area in the sky but the last beams of light were picking out the yellow leaves. The composition was almost a pin wheel with an anti-clockwise sense of rotation towards the sun almost suggesting that the sun’s rays were working against the trunk and leaves on the right. Even the silhoutted trunks hold detail and texture, nothing is fully silhoutted.
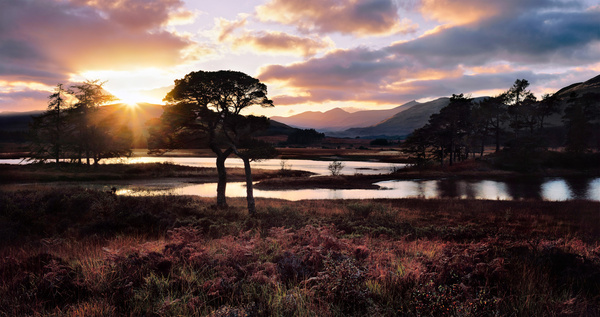
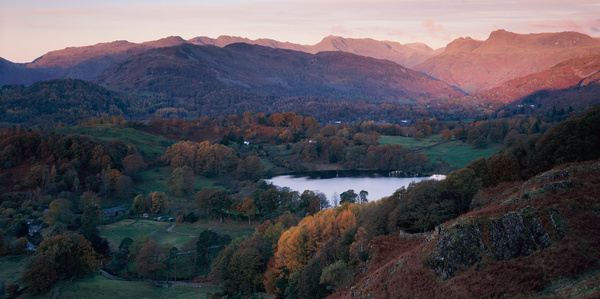
Stobh Coire nan Lochan
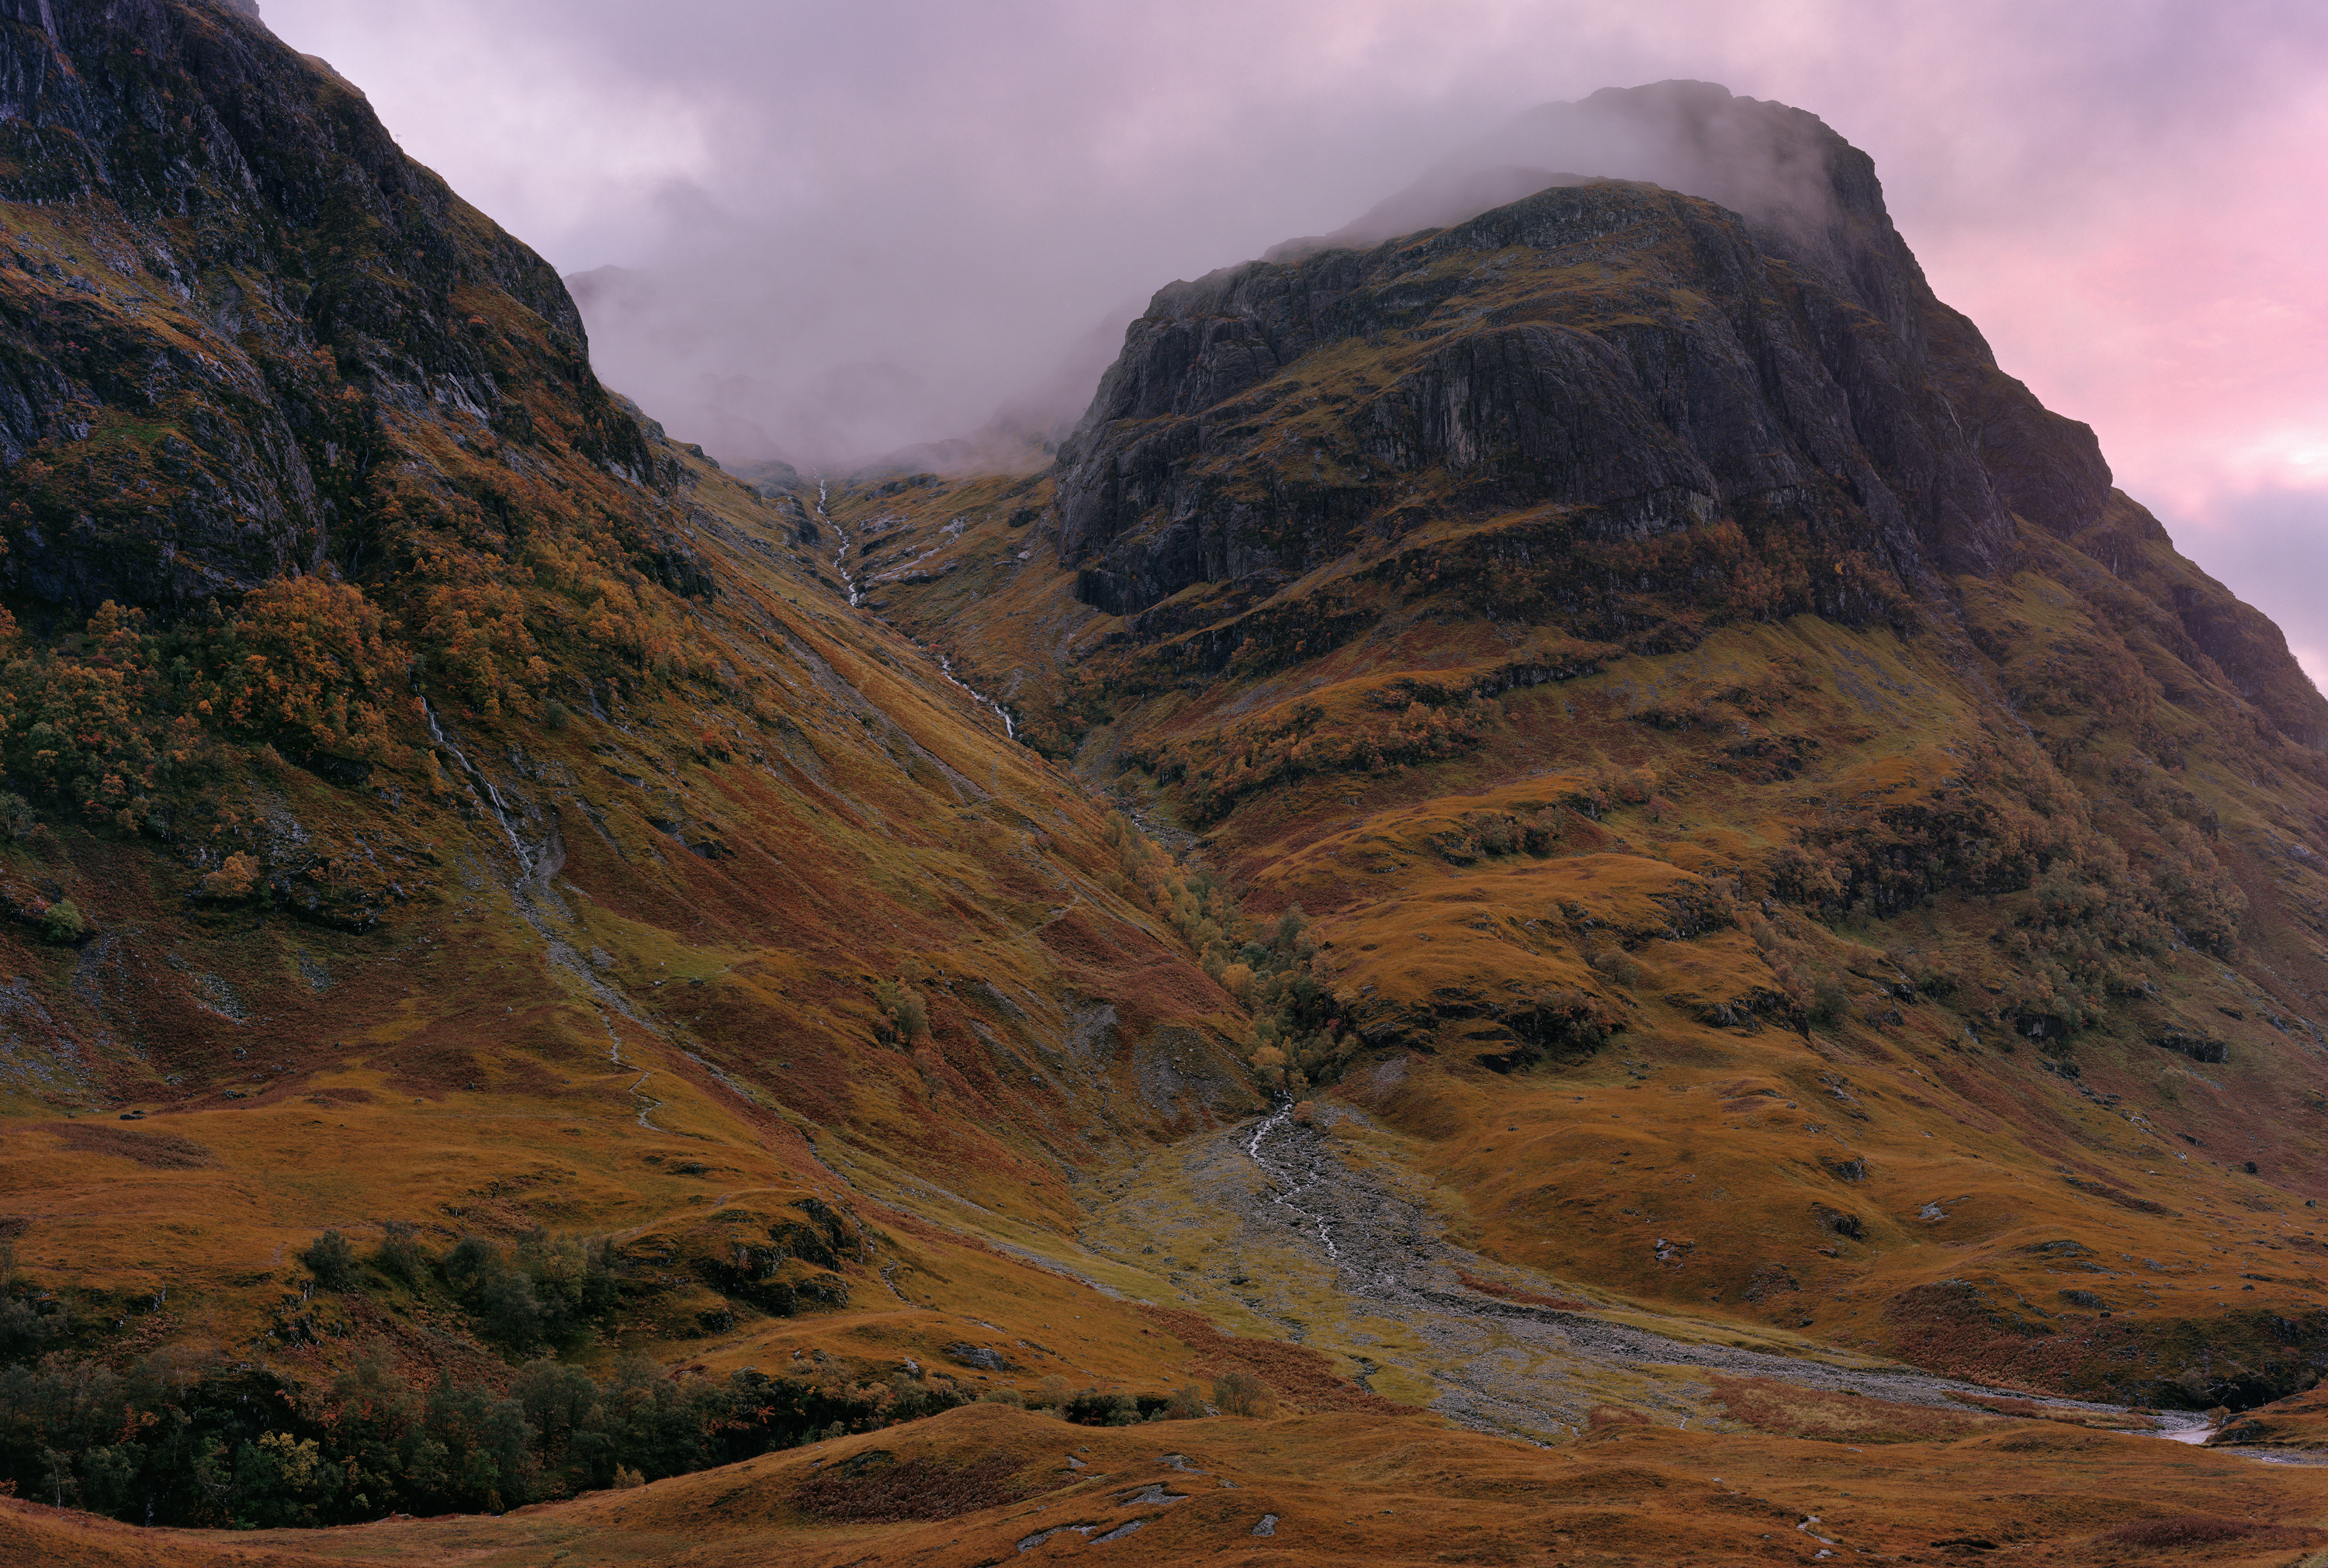
I’ve been fascinated by these big views of the sides of hills since I first visited Glencoe. One of my first large format shots was a panorama of the three sisters. Last year I took the 10×8 (Black Betty) to Glen Nevis and shot the side of Ben Nevis. It’s the textural part of these views that fascinate and it’s the raw capturing horse power of the 8×10 that can capture the very fine colour textures and the quality of film that can either capture the dynamic range or bring out the tones in overcast conditions. It’s made me realise that there is probably some mileage in continuing to capture some of these views, especially if I can combine it with the sense of sublime conditions like above.
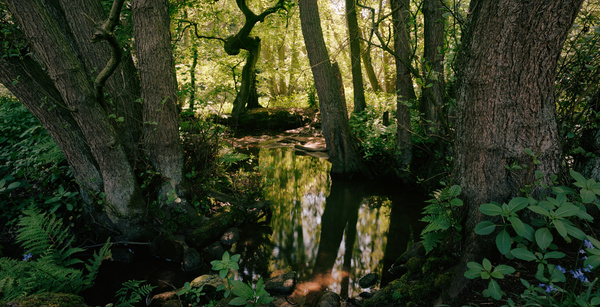
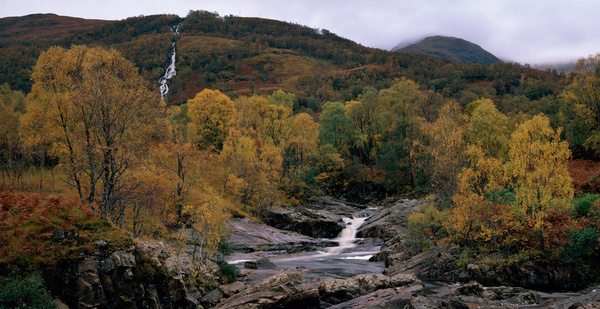
Leaves and Flow
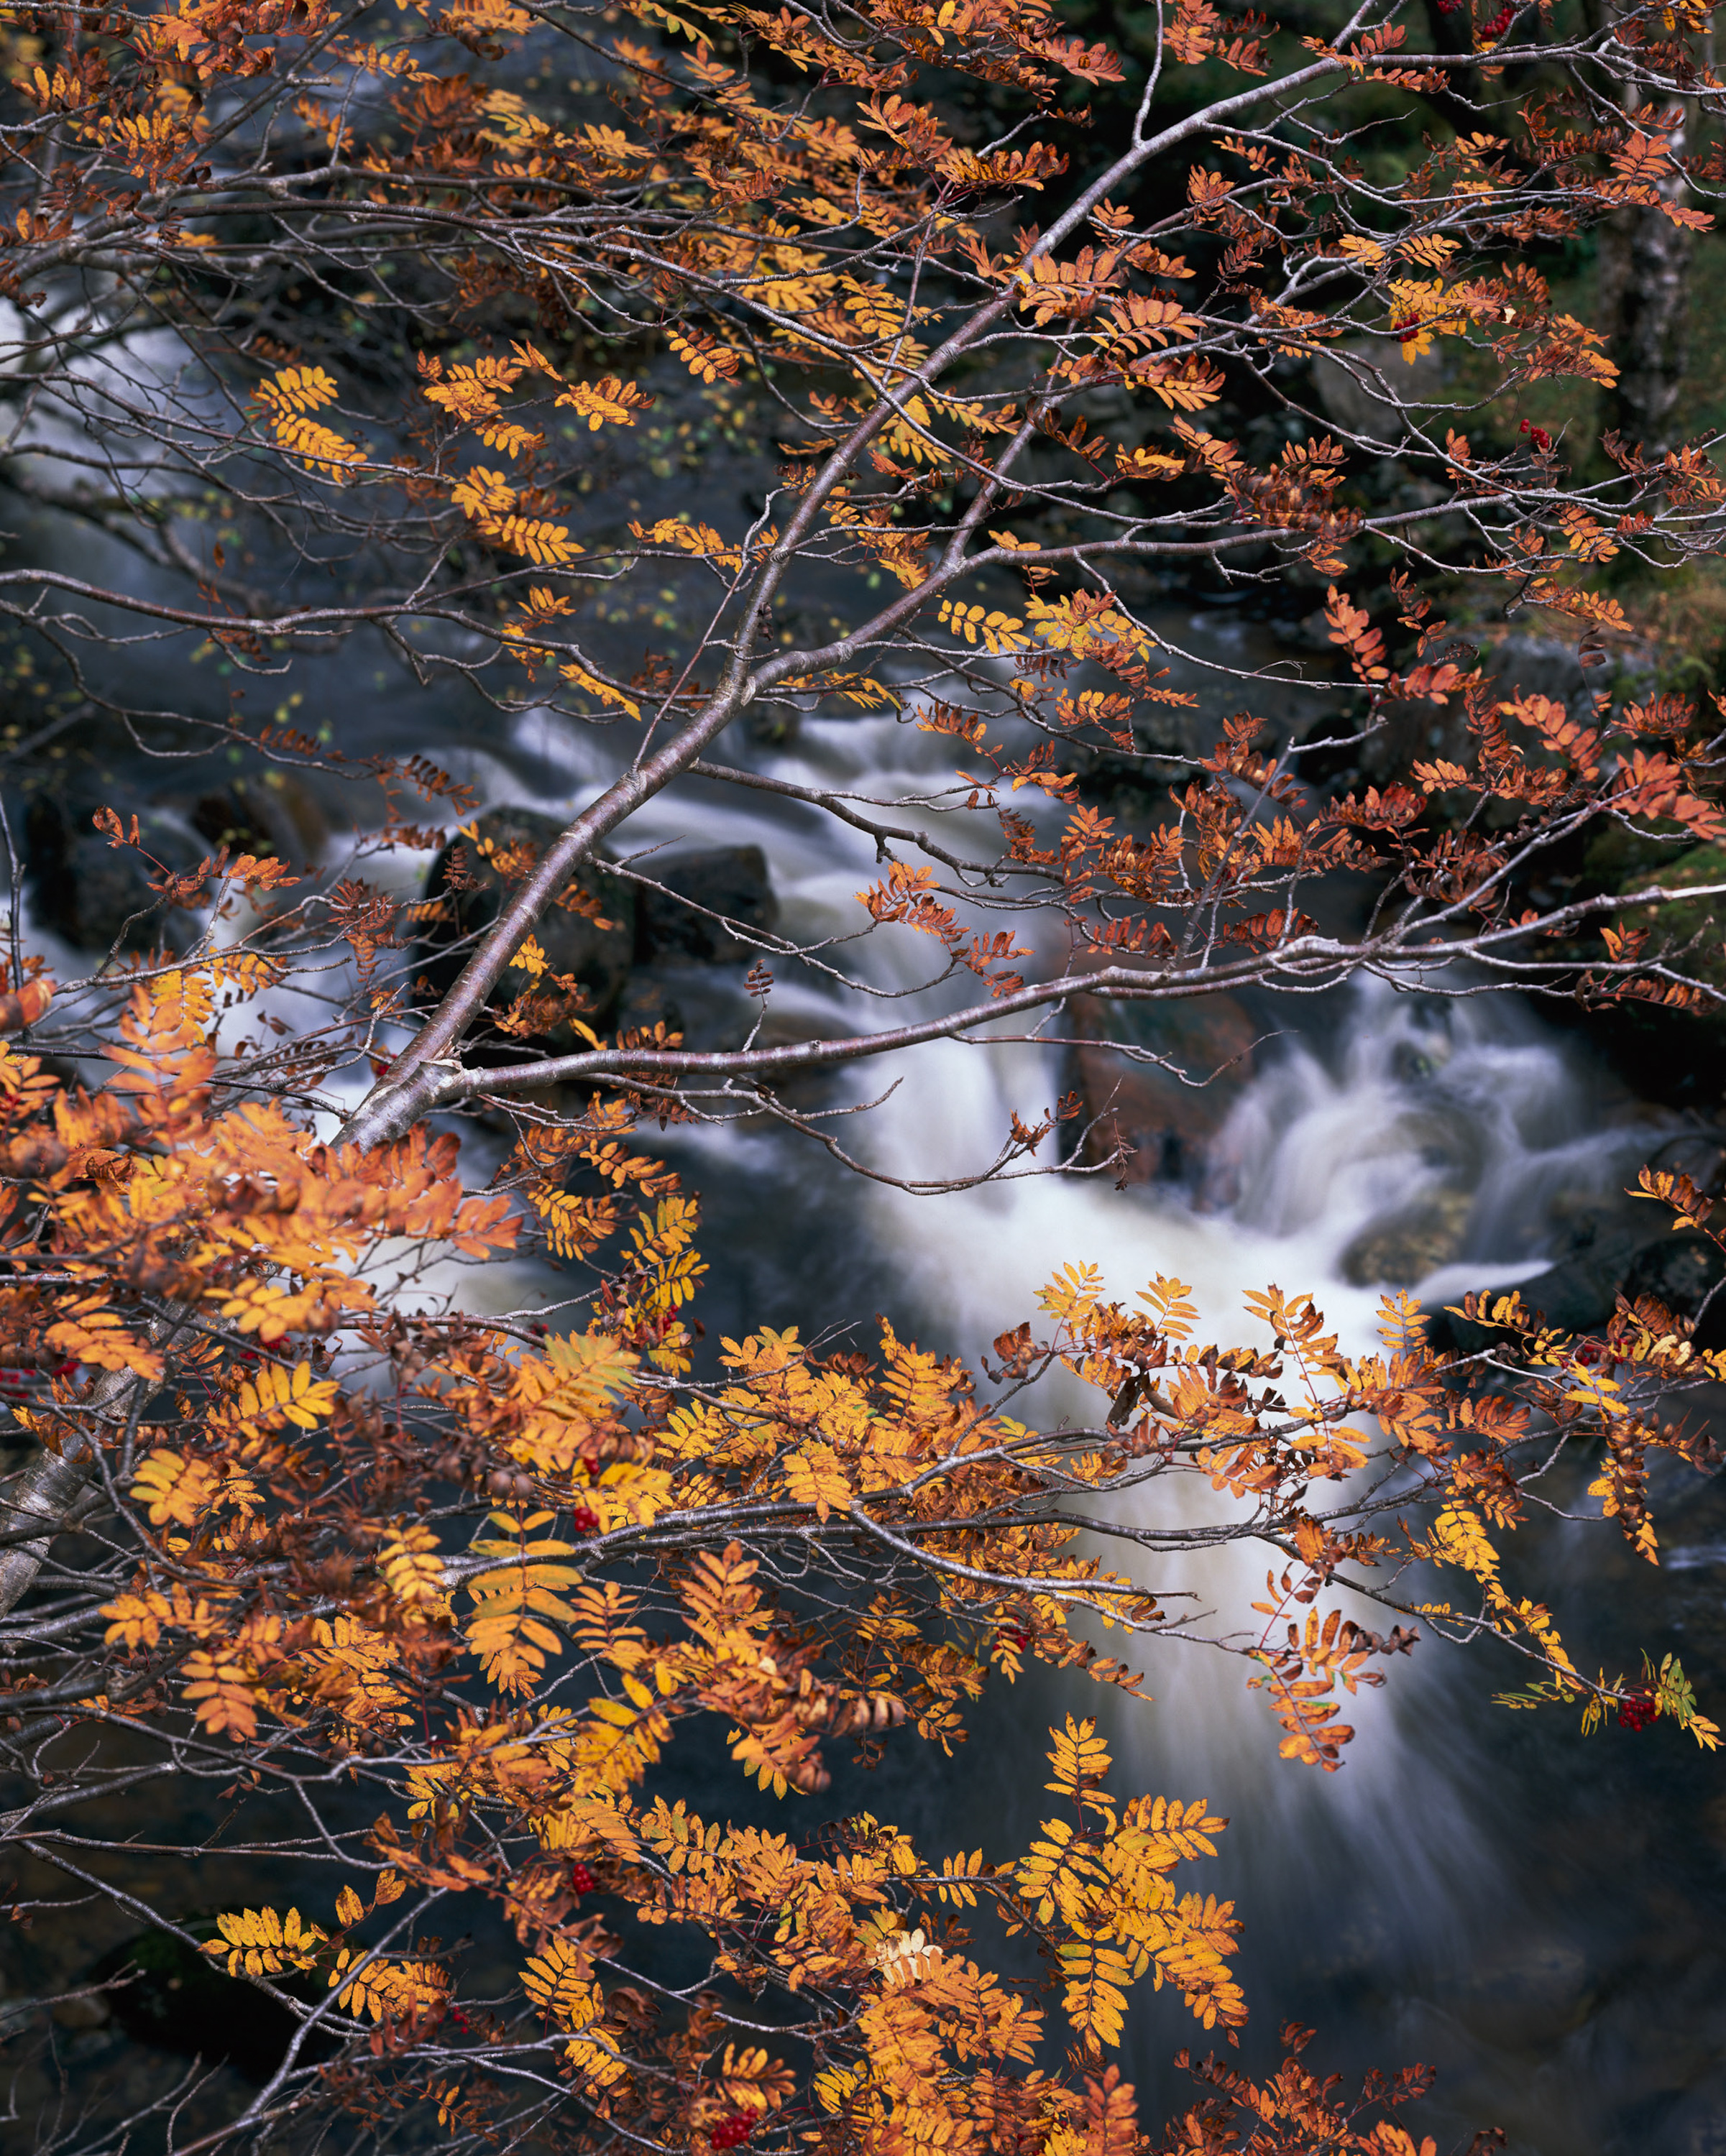
It can be very tempting as a large format photographer to try to get everything in focus. However, some of the advantages of many large format lenses are revealed when they are used with a narrow depth of field. The simple lens designs of tessar and dialyte lenses give smooth and creamy out of focus areas (Nikkor M and Fujinon A lenses in my case). Used in conditions such as this we can create a layer whose sharpness appears amplified by the softness of the background (This was taken on my 200mm Nikkor M lens). The composition itself relies on a positioning of a band clear of leaves that reveals the river and the hint of light in the river in the top left of the composition. In addition I wanted to place a bunch of leaves over the creamy, turbulent water. You can’t tell here but I was perched on a worryingly small wooden bridge with missing planks and I was terrified of losing things every time I removed a lens or lens cap. The only post processing was to tone down some of the green leaves that were disturbing the overall tonal relationships.
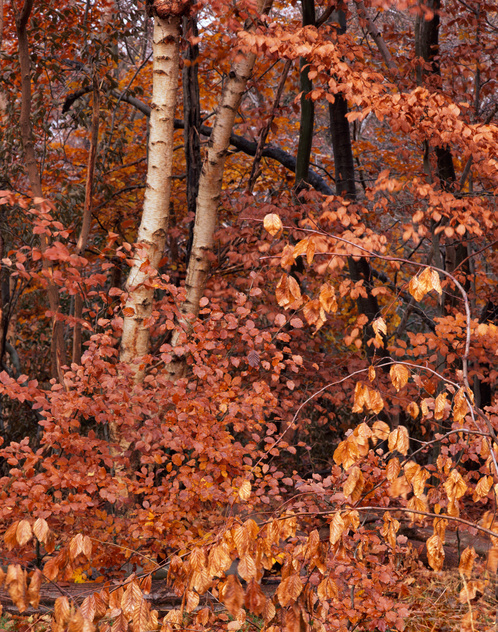
Birches on Ektar
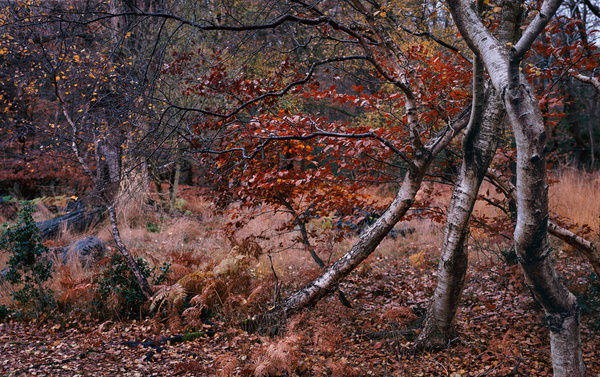
It’s probably not a surprise to know that I’ve been experiementing with different types of film for the last couple of years and many times over this period I’ve taken the same subject on various film stock (to a ridiculous extent in my film comparison tests). At this point I’m only using a smaller range of films and in most cases either Portra (160 or 400), Velvia 50 or Provia. I’ve got some E100G, Velvia 100F and 100 and also some Astia left that I’ll use now and again. I’ve only just started to look at Ektar again having had some bad experiences in the past with it.
I think the combination of generally over exposing the film (I place the shadows at about -1 to -2) and also a change in scanning technique or just more experience has helped me make the most of this film. In particular I took a photograph of Ingleborough and Southerscale in the latest 2012 gallery that looked better on Ektar than Portra 160. The composition above was taken on Velvia 50, Portra 160 and Ektar 100 and the three images ended up looking very similar indeed with the Ektar looking closer to the Velvia than the Portra 160, in particularly in the greens. The image below shows Ektar then Velvia then Portra 400.
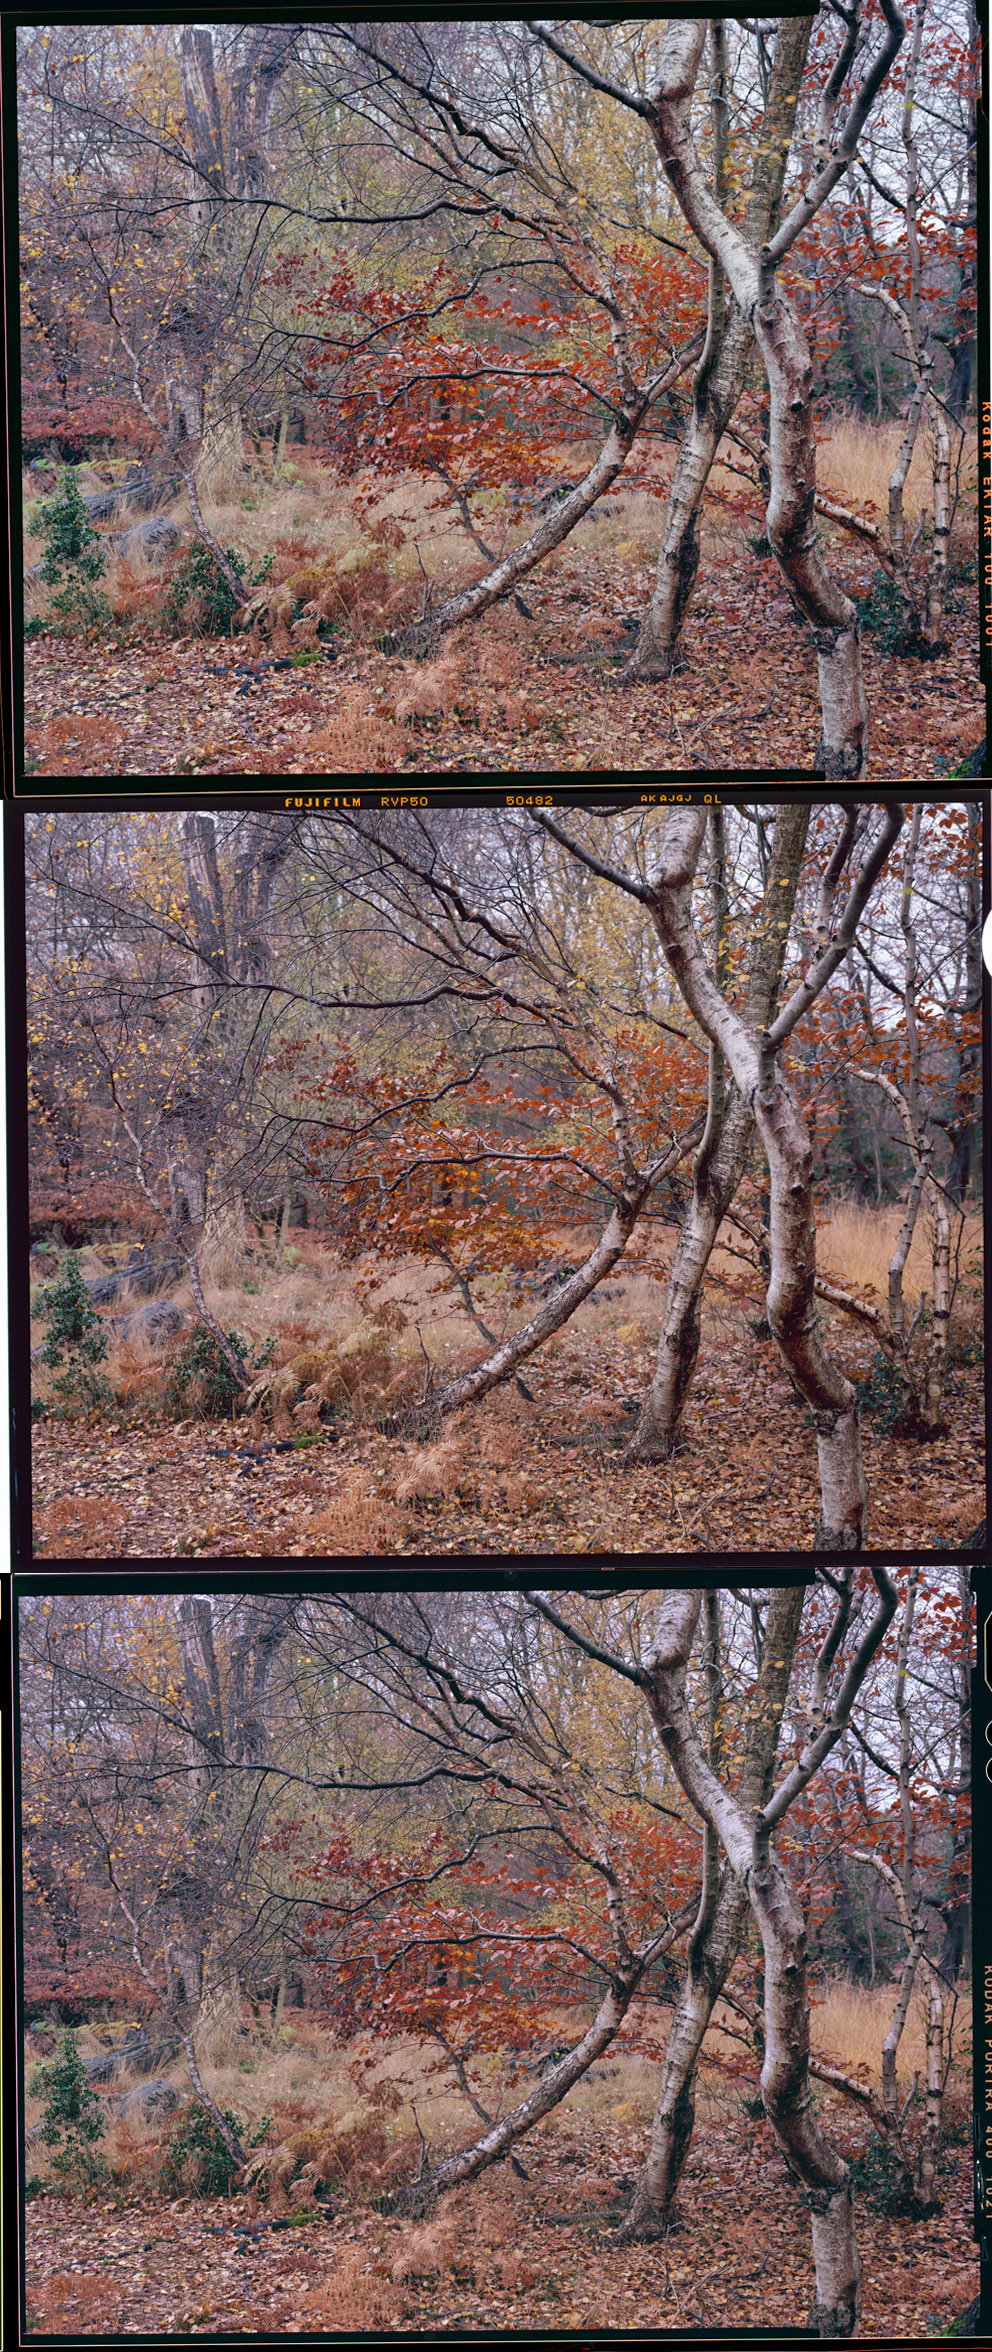
I’ll be posting a few comparisons over the next month or so.. Here’s the A900 shot in the meantime..

Sun Through Frosty Birch
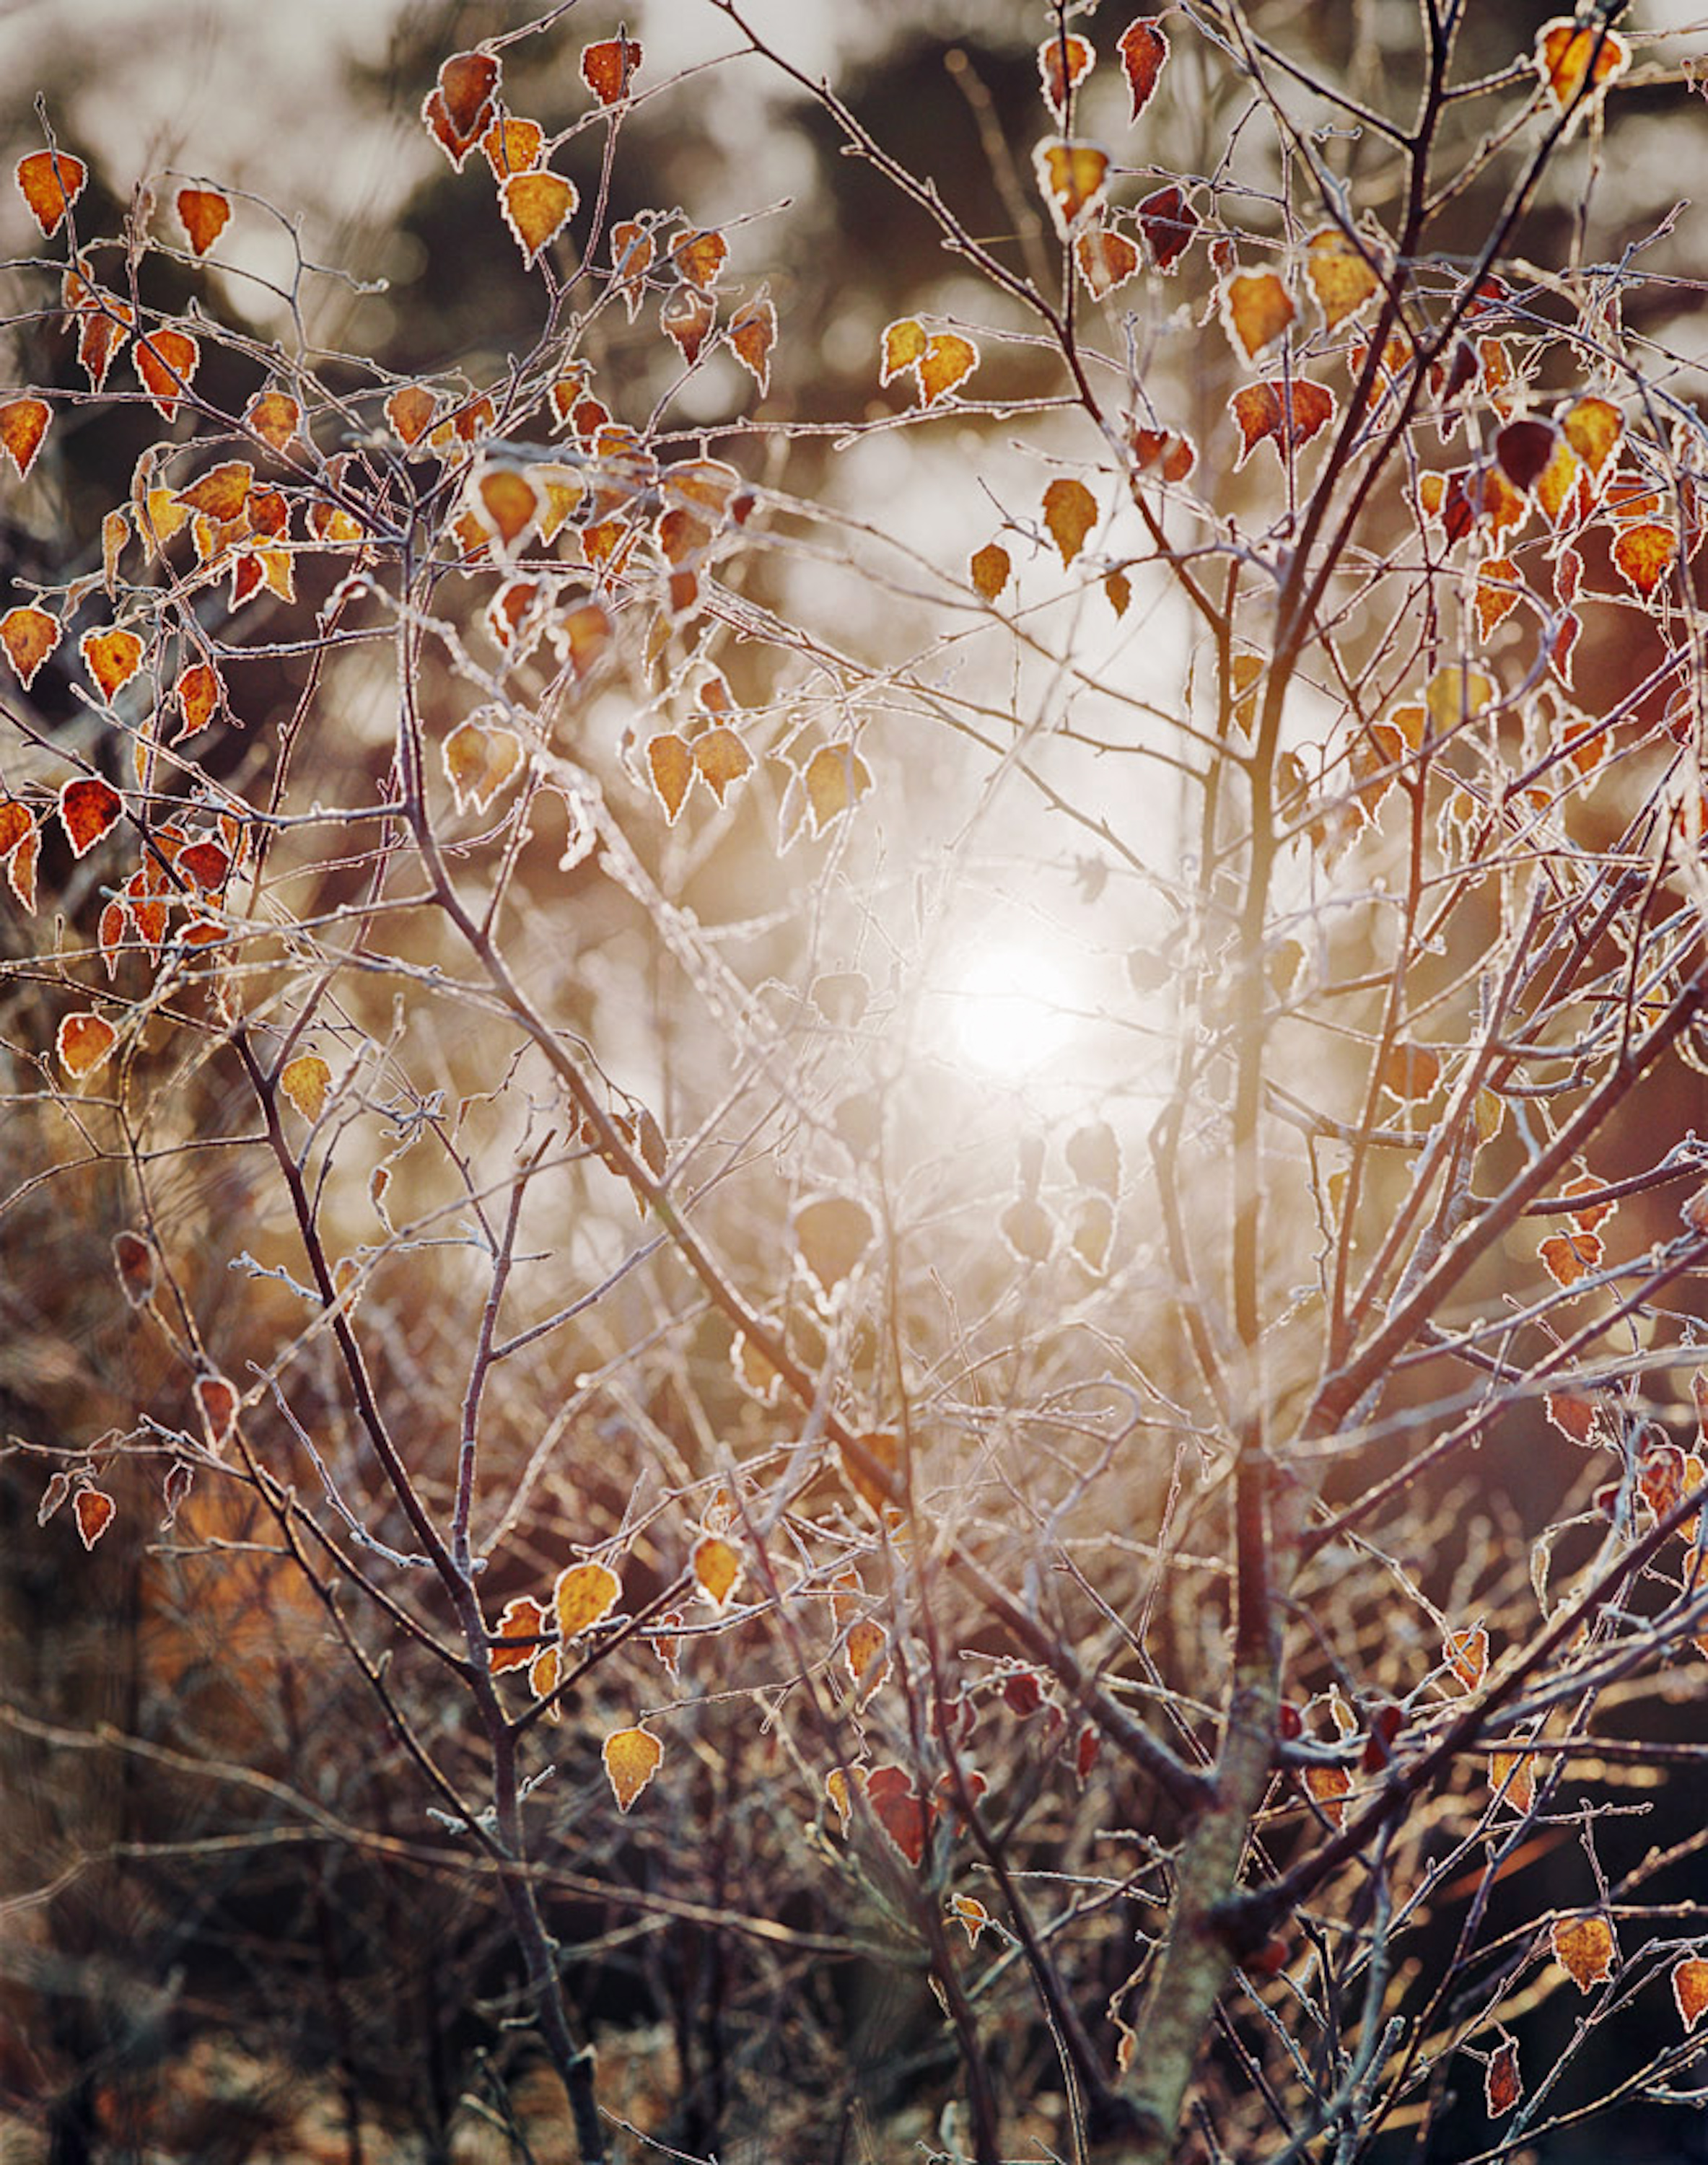
I took a shot last year of the sun through the leaves to the sun and loved the effect. When I had the opportunity to do the same with frost and through the beautiful heart shaped leaves of the downy birch I couldn’t resist. Portra makes getting a result from shots like this a breeze. The main choices were in how bright to represent the sun and possibly I’ve darkened the area around the sun a little too much but it allows your eye to wander the leaves easily. A brighter sun would look more ‘real’ but would also push your eye to the edges of the picture – difficult balance.
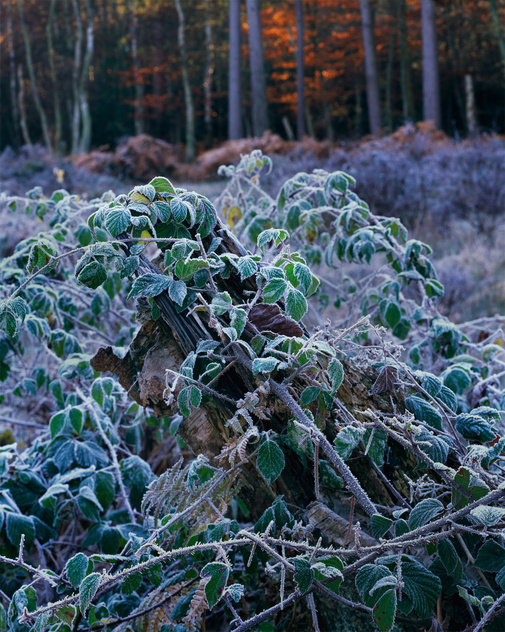
Early Frost
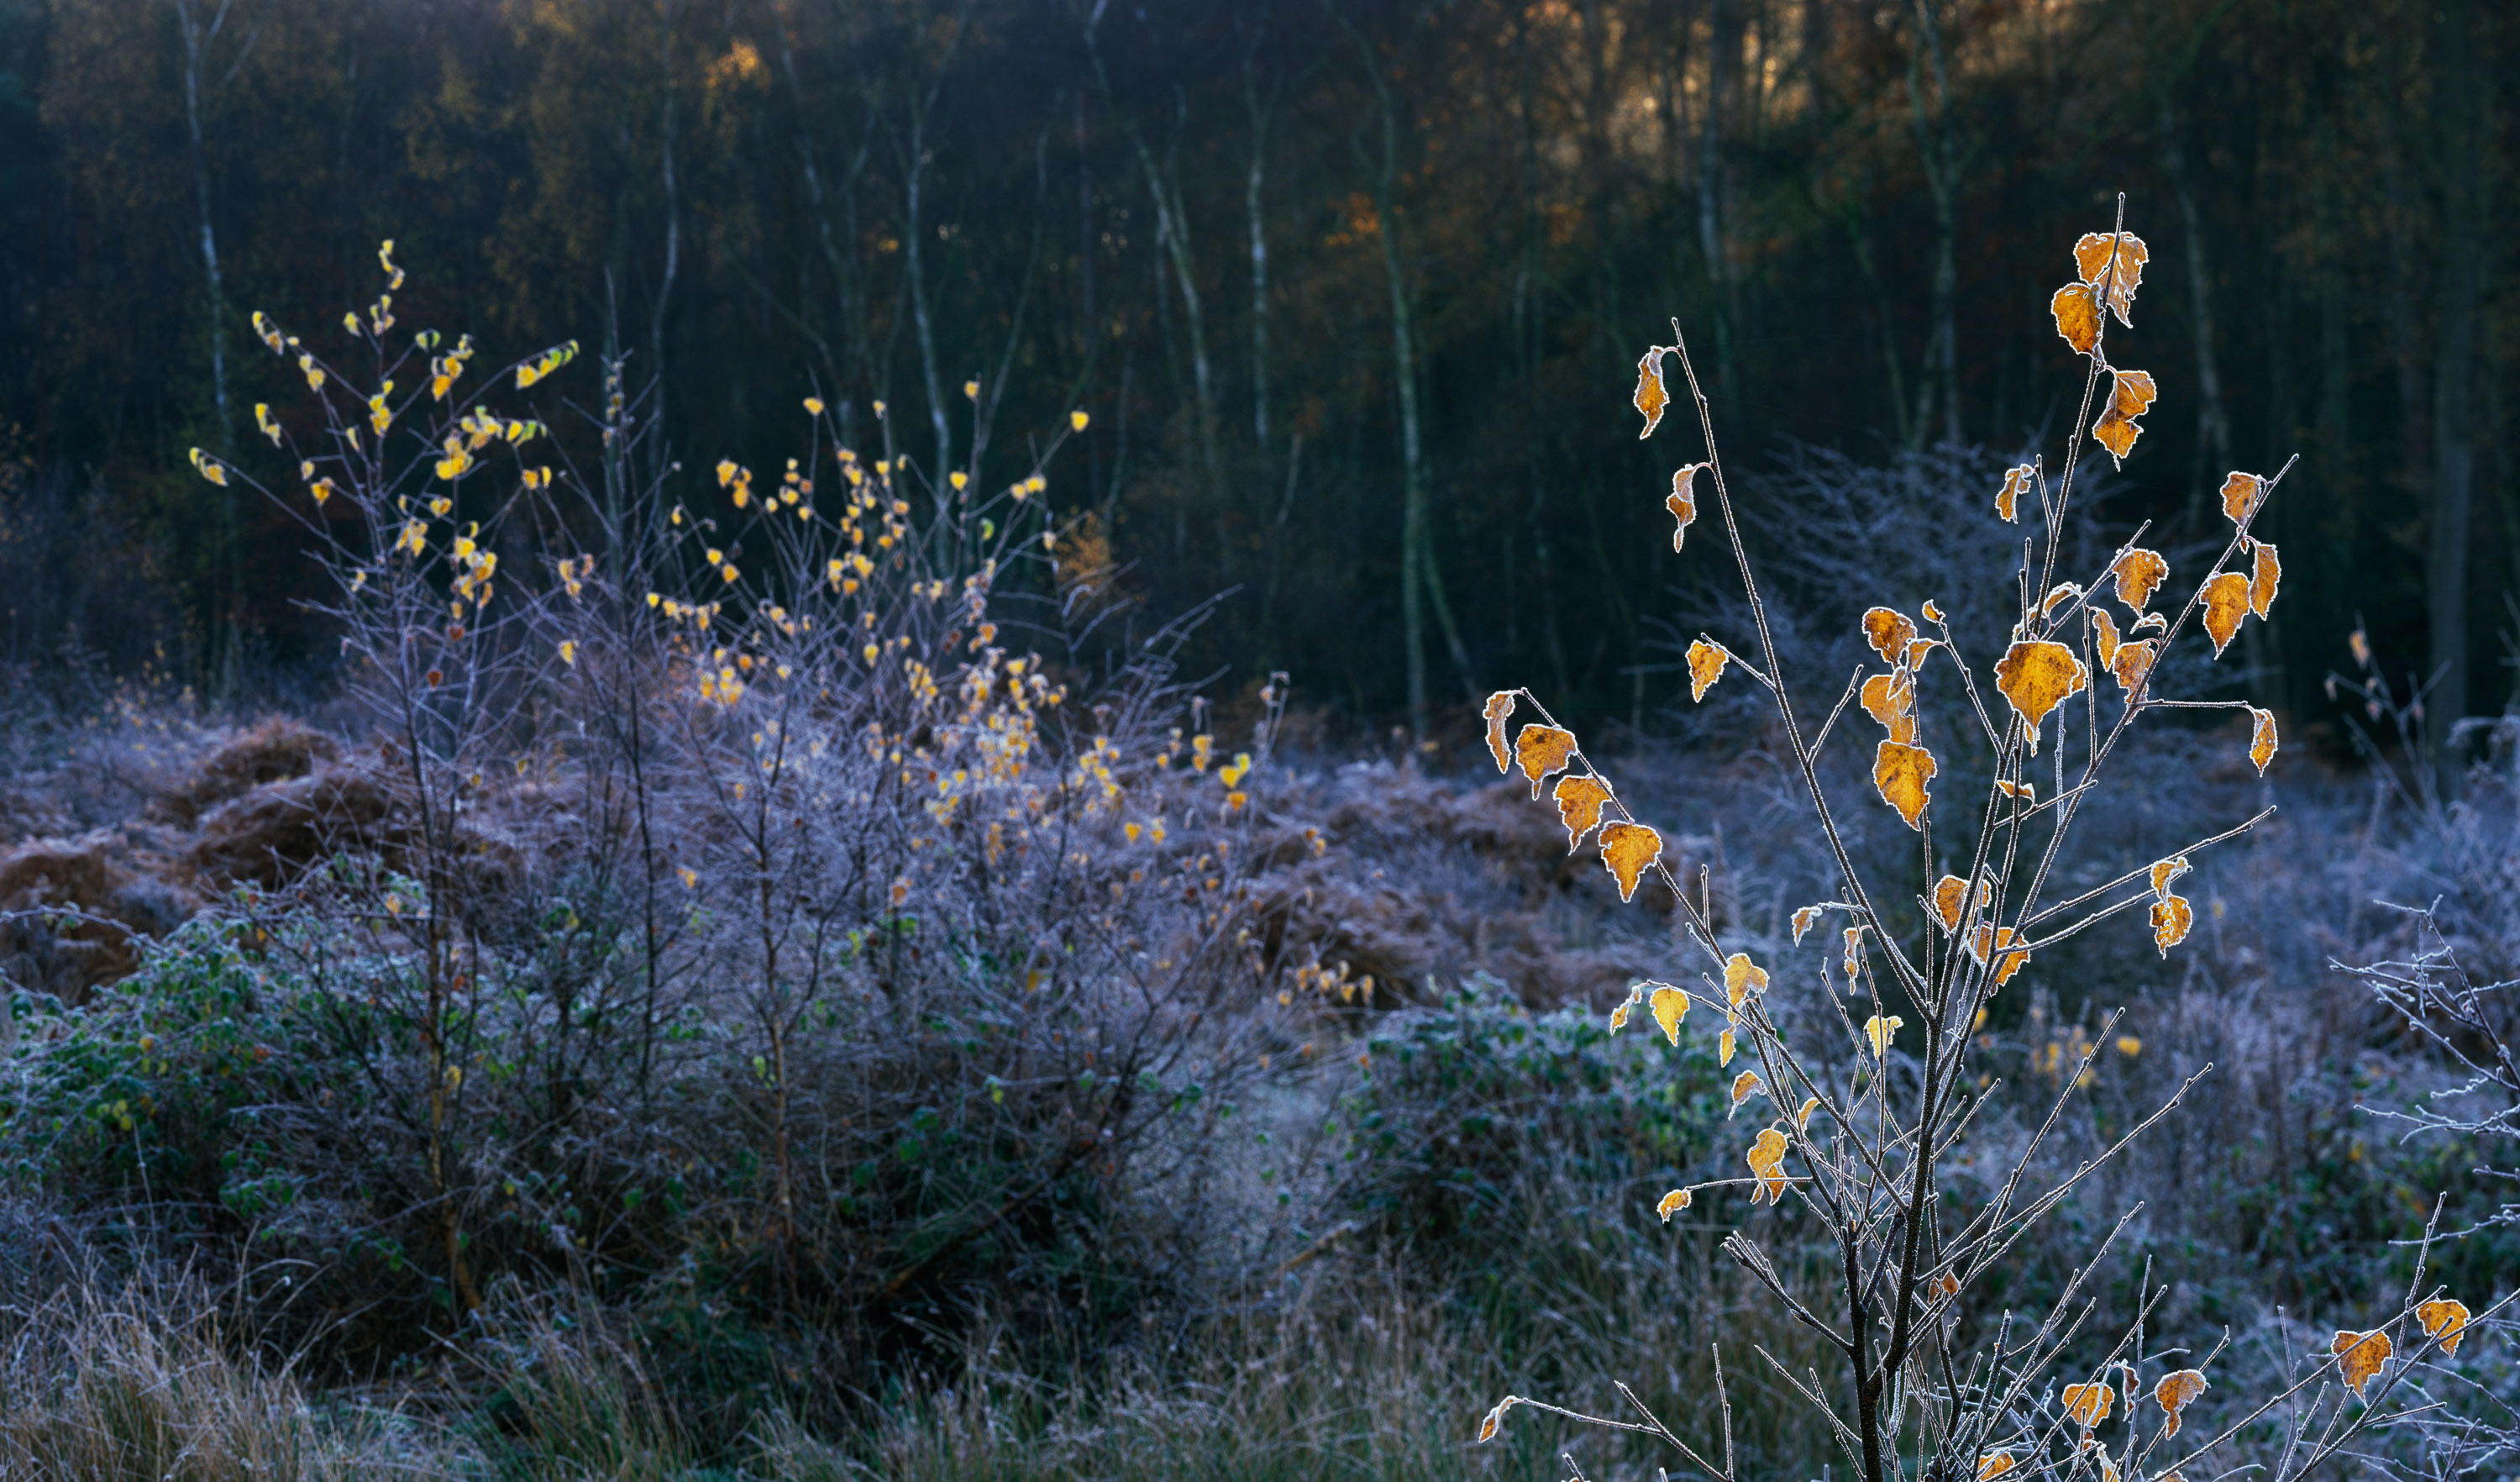
Taken just a few minutes after the previous shot whilst out with Paul Mitchell and Roger Longdin at Burnham Beeches. I’ve always been more concerned with composition than light but I feel I’m at a stage in my development where I can actively combine everything together. In this case it was the raking light in the background that although it wasn’t lighting up the downy birch in the background, it looked as if it might be if I positioned things correctly. I had only been out in one frost before this and it reminded me just how magical these conditions are in simplifying shapes and tonal relationships. This is another case of using the panoramic format in way a little different from ‘Ooh look at the width!’ (I know I’m still guilty of this but I’m trying!). The sense of depth in the stage is reasonably strong through the use of obvious ‘planes’.
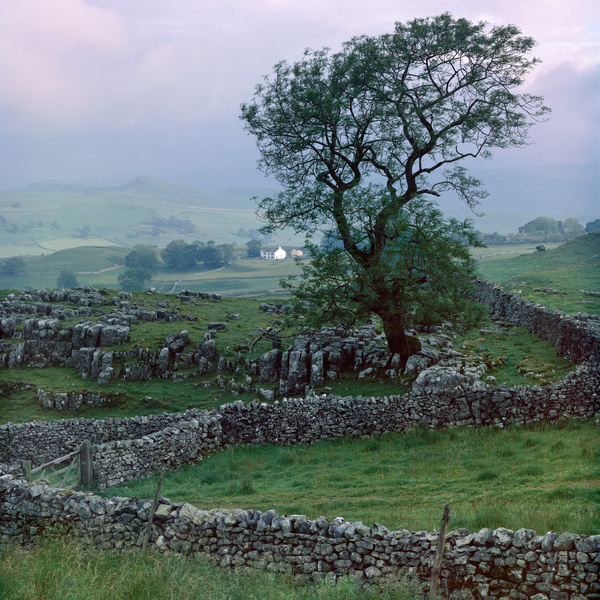
Ingleborough and Southerscales
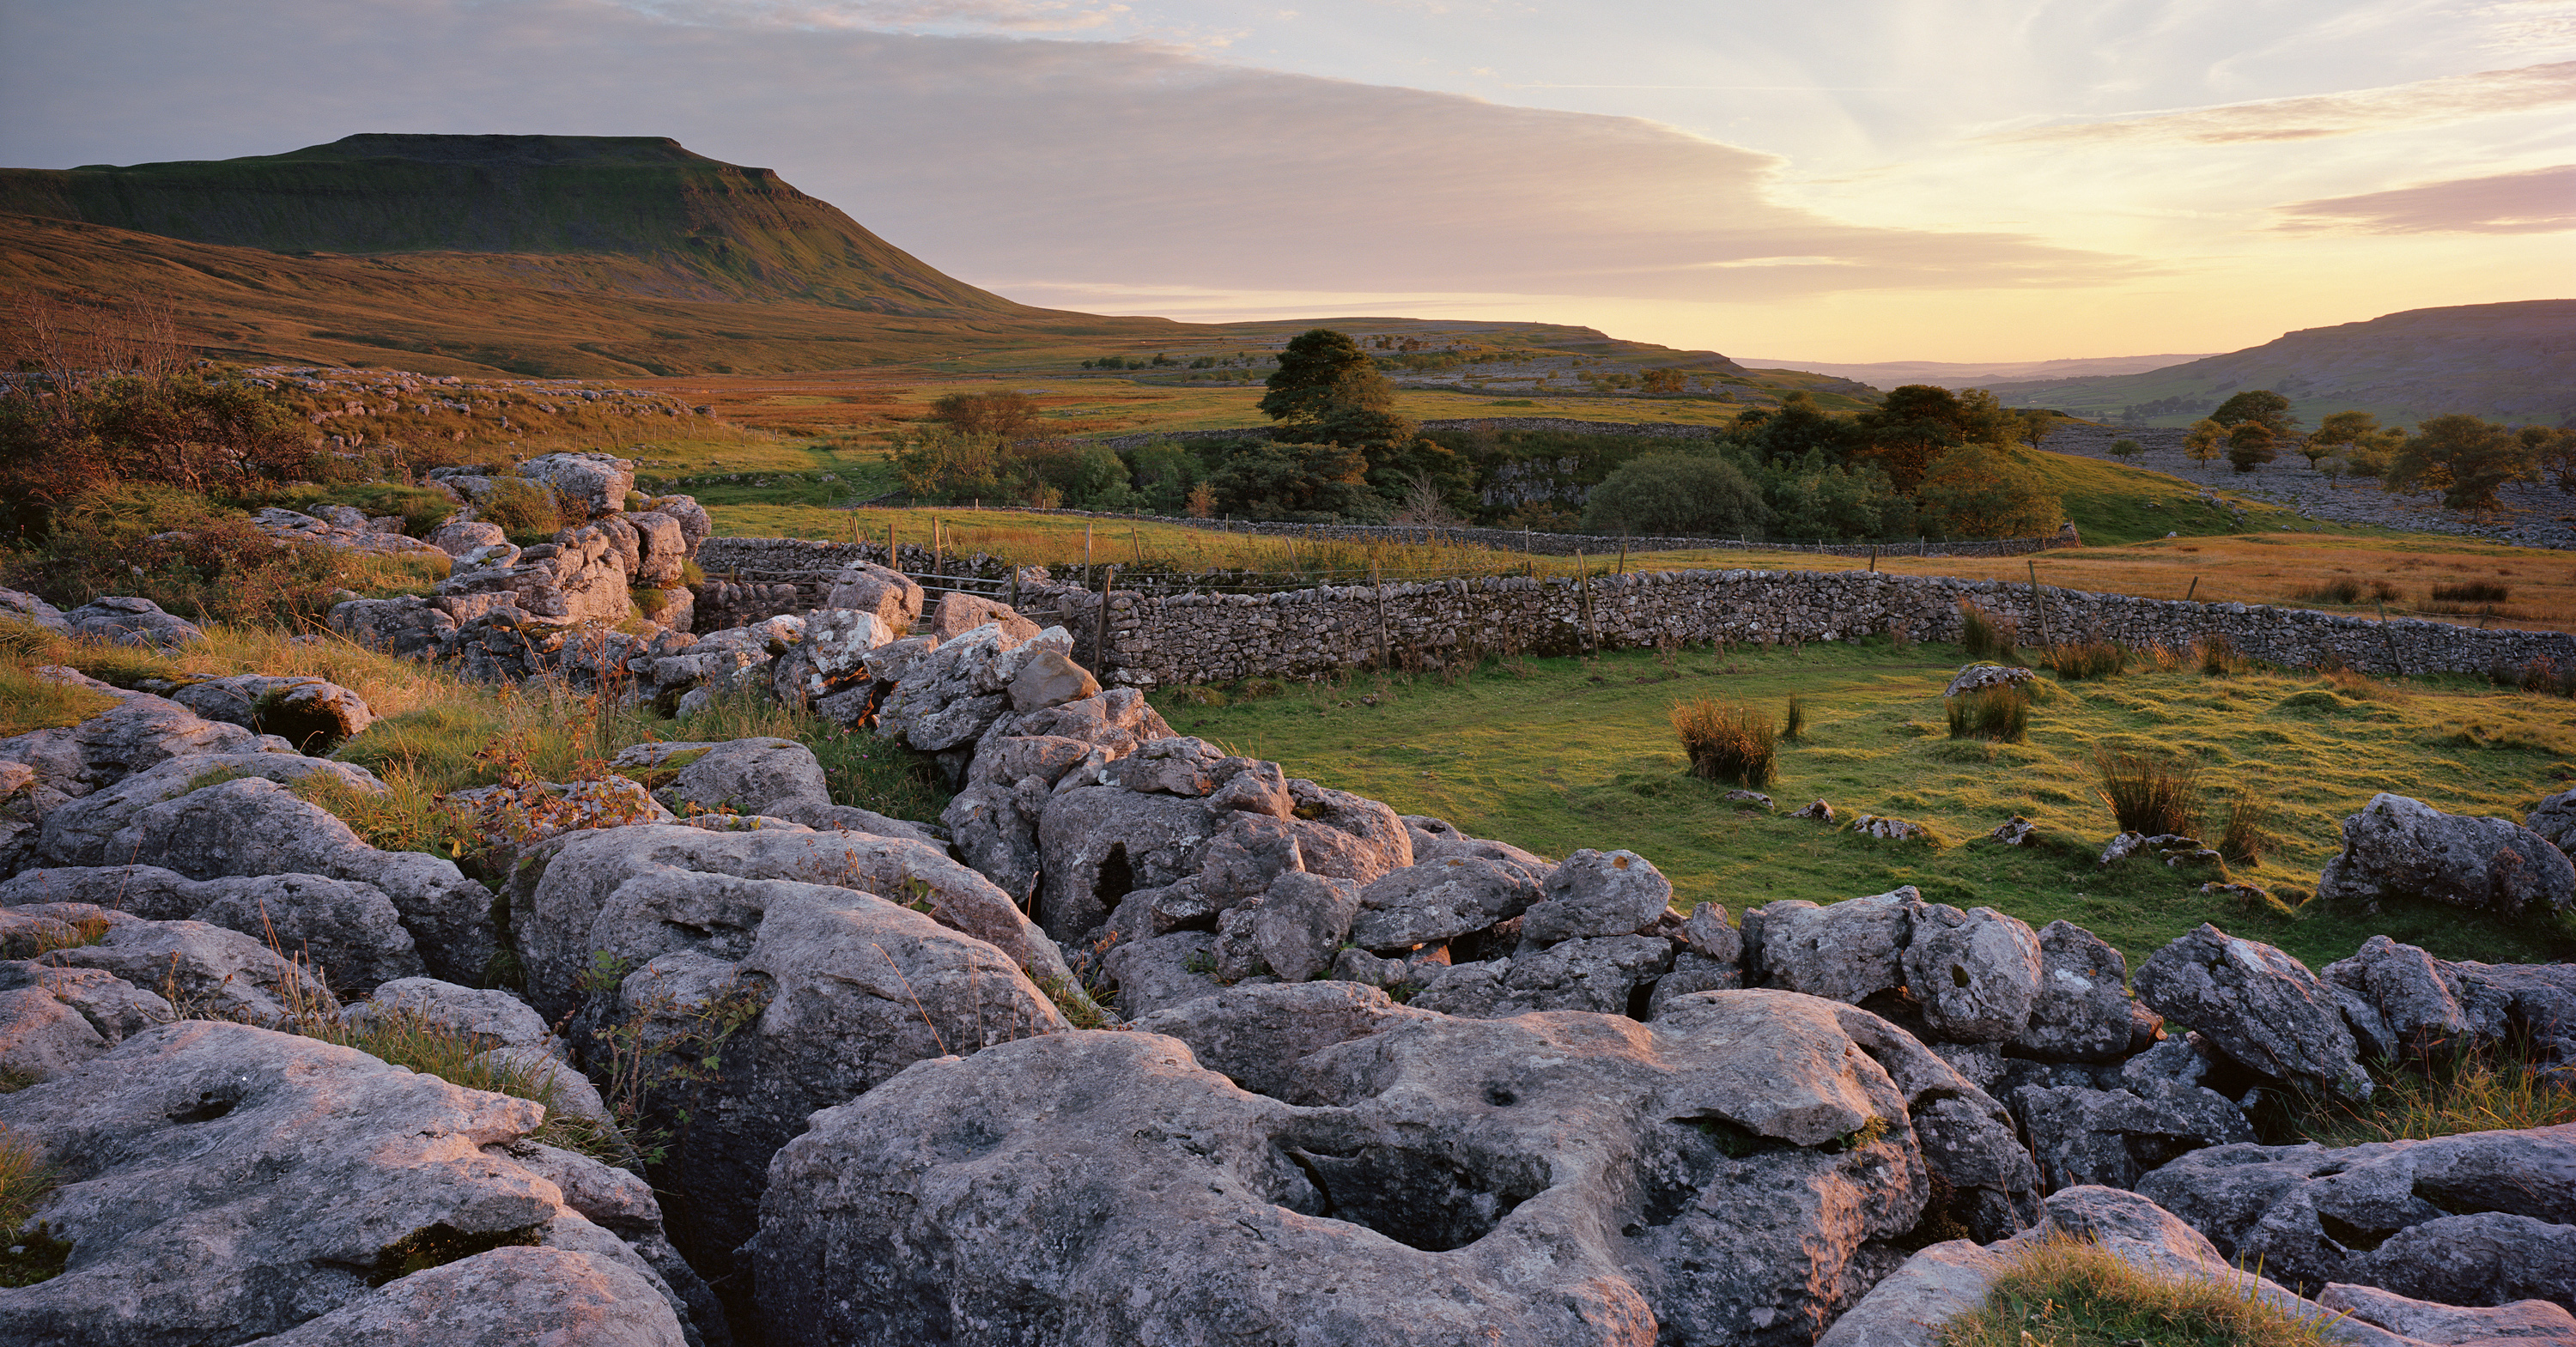
I’ve been entranced a little with Southerscales since Joe Cornish took me there in the middle of this year and this particular composition came about when I was scouting the area with Paul Arthur. Originally I was trying to find something for Paul because the main area of Southerscales it pretty complicated and something a little more bling was desired. Paul ended up going over to Ribblehead and so I worked the scene a little. As I moved around I started to see the relationships between the horizon from Ingleborough and the stone wall and then the valley shape and the limestone pavement. As the sun progressed across towards the horizon the clouds began to give me some more complementary shapes. Finally I wanted to capture the raking light across the limestone pavements and the grasses and so there was only a few moments to capture the frame as the light dimmed.
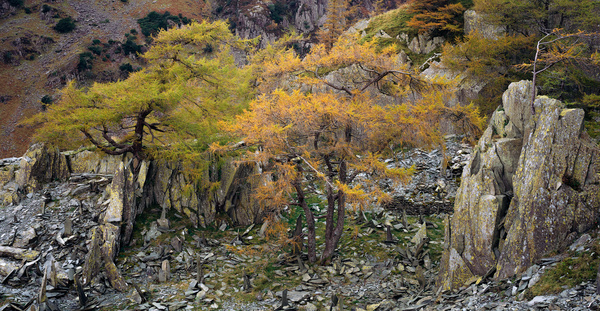
The Pulpit

David and Angie Unsworth took me to visit their ‘secret’ slate mine in the Lakes for which I’m am extraordinarily grateful. The location was superb and the larches, protected from the inclement Lake District weather by the walls of the quarry, grew tall, lush and feathery and the ground, inhospitable to the usual grasses was covered in mosses and liverworts. Perched on the end of a tongue of this moss was an oak tree looking for all purposes as if it were about to hold a conclave of the larch. Terribly anthropomorphic but I couldn’t help it!
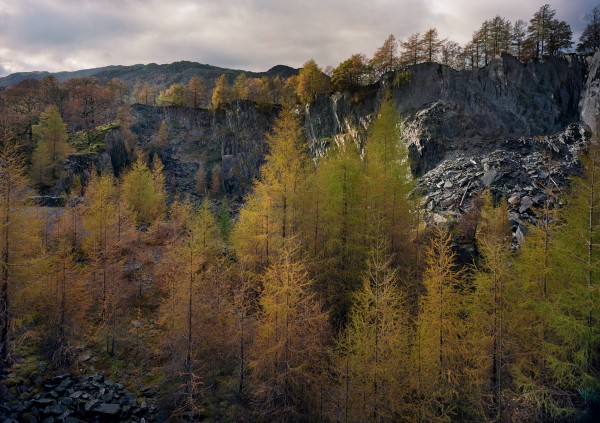
Larches Wide
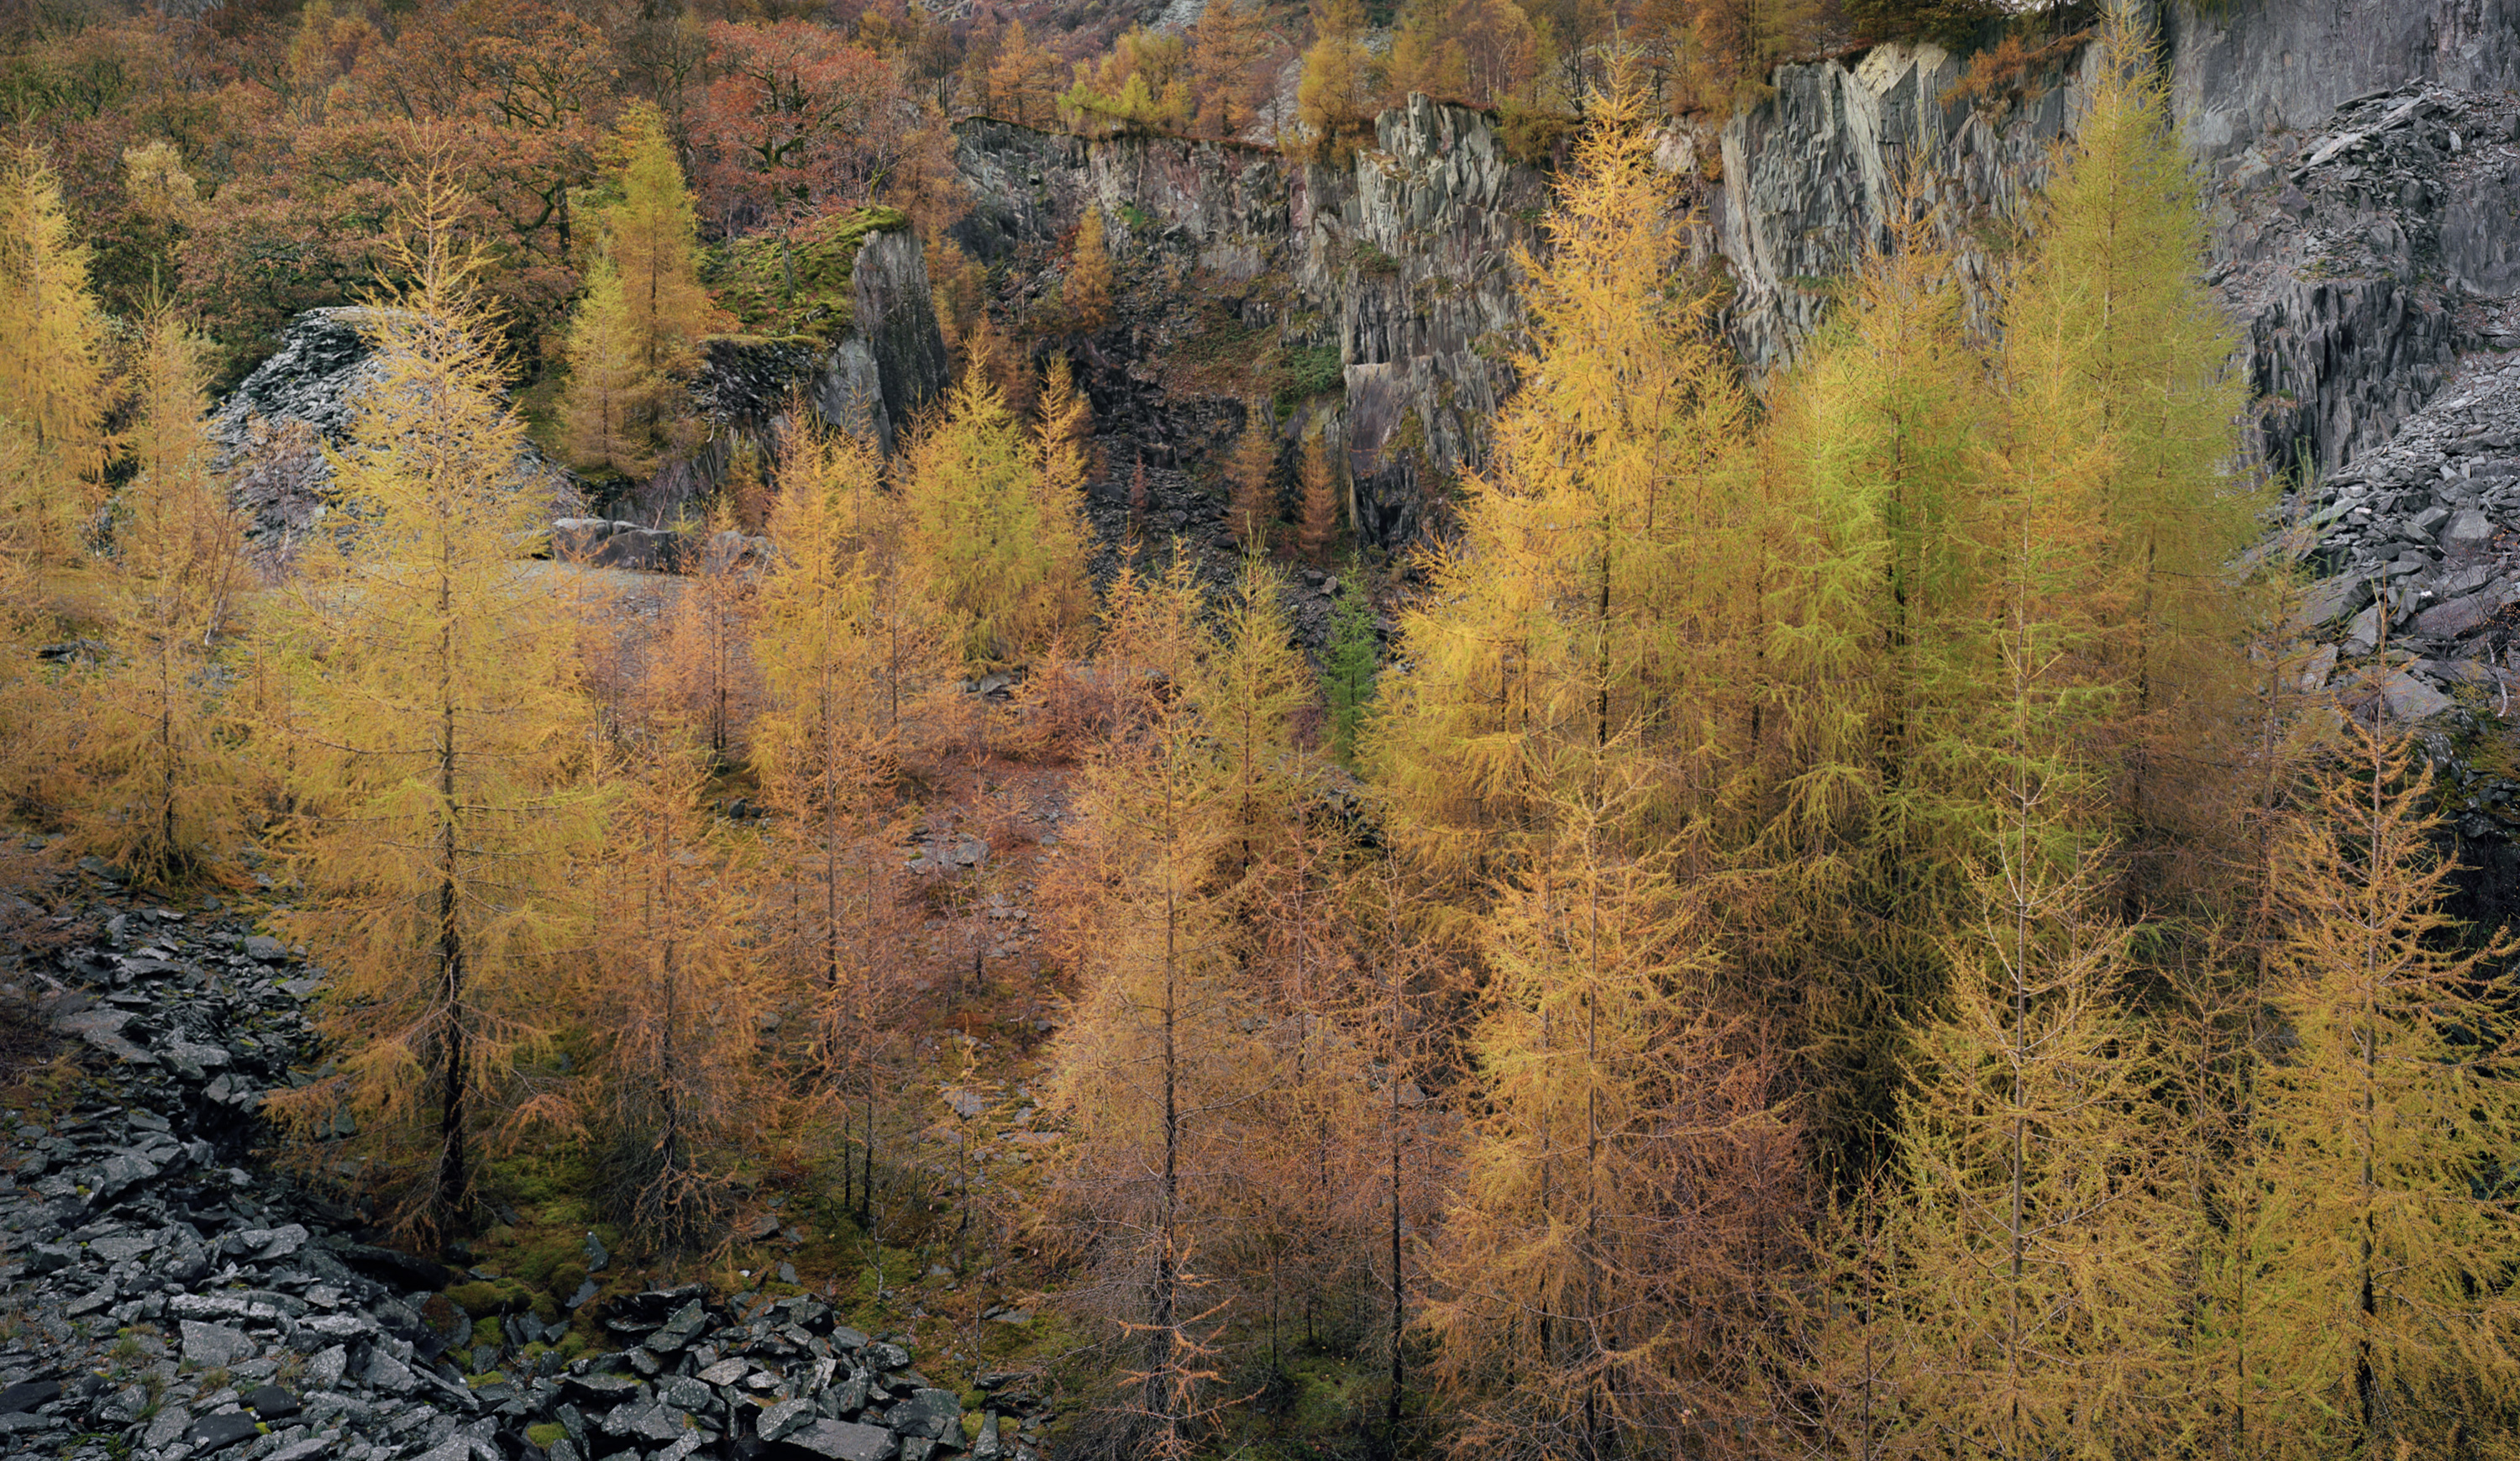
I try not to repeat the content of an image but in this case it was too tempting. This was in fact the first image captured and I was trying to capture the reaching larches mentioned earlier in the context of the quarry itself. I was trying again to create a panoramic composition that moved beyond “WIDE!” and I hope it moves your eye across the front from right to left and then back across the rear wall of the quarry. Most of the interest for me is in the 3D levels of the scene and the mossy ground, the beautiful feathery larches and the interest in the rear wall of the quarry. A particular favourite – if you like it, try asking me about the perspective fixes that were made in the production of the image and we can chat about whether they’re ‘legitimate’ or not..
So I hope you get an idea of what excites me and what I’ve been thinking about in my photography over the last 12 months. We’ll see where it takes me in the next year!
Click to view full post including 15 Comments